
Introducing Duck Gear by LRDT
Otherwise known as building a Goose Gear quality drawer system for an Ikea price. And way too many hours of labor. Extrusion frame, plywood drawers, a fridge slide that didn't fit, and the rebuild that made it right.
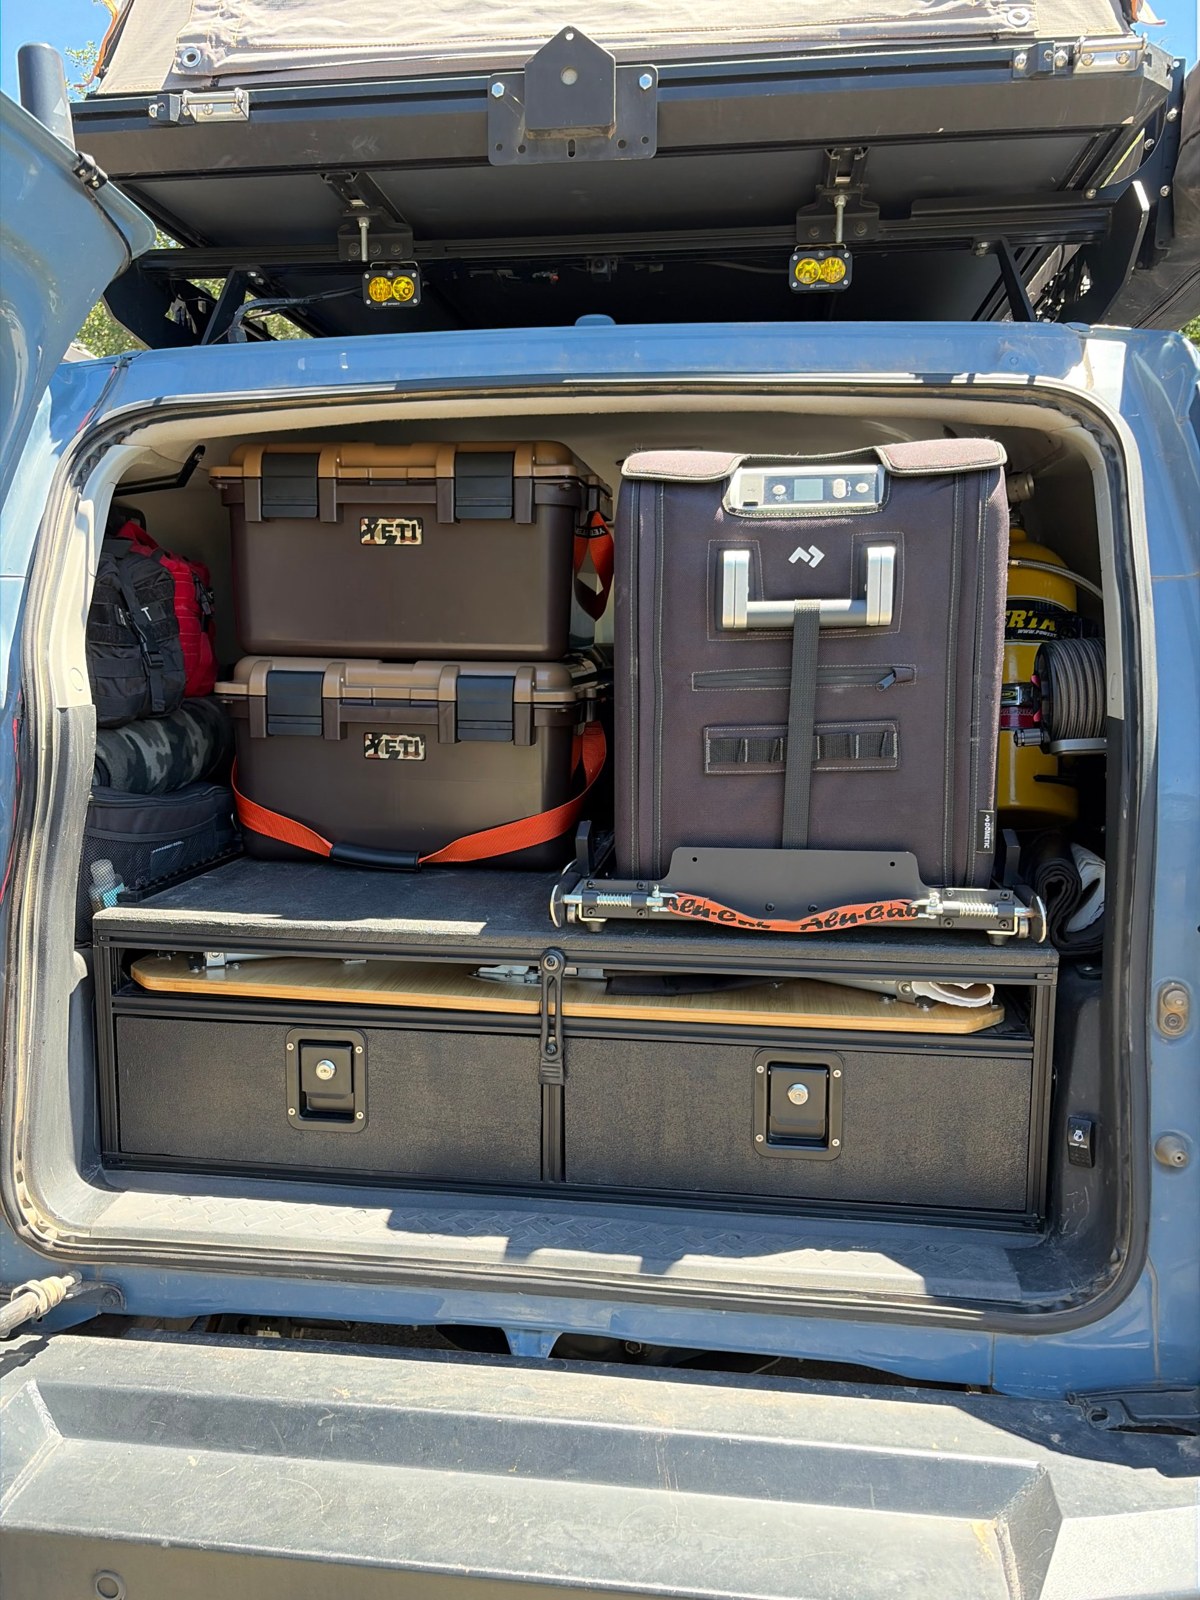
Goose Gear quality. Ikea price. Way too many hours.
This is a two-drawer cargo system for a 2014 FJ Cruiser, built from 2020 aluminum extrusion and birch plywood, with a Dometic CFX3 45 on a tilting slide up top and a camp table stored in a slot inside the box. It replaced an all-plywood box and has been in daily use since December 2024.
It's written for someone who wants to build their own, not buy one. This post is the story and the decisions; the drawings, the cut list and the numbers are in the Duck Gear plans. The parts came from Amazon and a couple of overland vendors, the tools were a portable bandsaw, a drill and a paint roller, and the planned budget was $466. If you have the cargo bay of an FJ, a 4Runner, or anything with four OEM tie-down bolts in the floor, most of this transfers.
The build happened in three chapters, and the post follows them in order:
- The first build, November to December 2024: the extrusion frame, plywood drawers, and a hinged flap under the drawers for the camp table.
- The fridge slide swap, early 2025: the new box sat taller than the old one, the original slide no longer cleared the rear seat backs, and a shorter slide went in.
- The rebuild, June 2025: the hinged flap sagged under a loaded top and the table bound up, so the table moved into a dedicated slot between the drawers and the top. That version has run about a year and a half without complaint.
The case for extrusion over a welded or all-wood box is chapter three. Adding a whole new level to the frame cost four lengths of extrusion, a bag of brackets and an afternoon. In wood it would have been a new box.
This is what we did to our own truck, not instructions for yours. Anything in a cargo bay becomes a projectile in a crash, and the tie-down is the part of this build that matters most. If you build one, you own the engineering, the anchoring and the risk. LRDT accepts no liability for anything you build from this post.
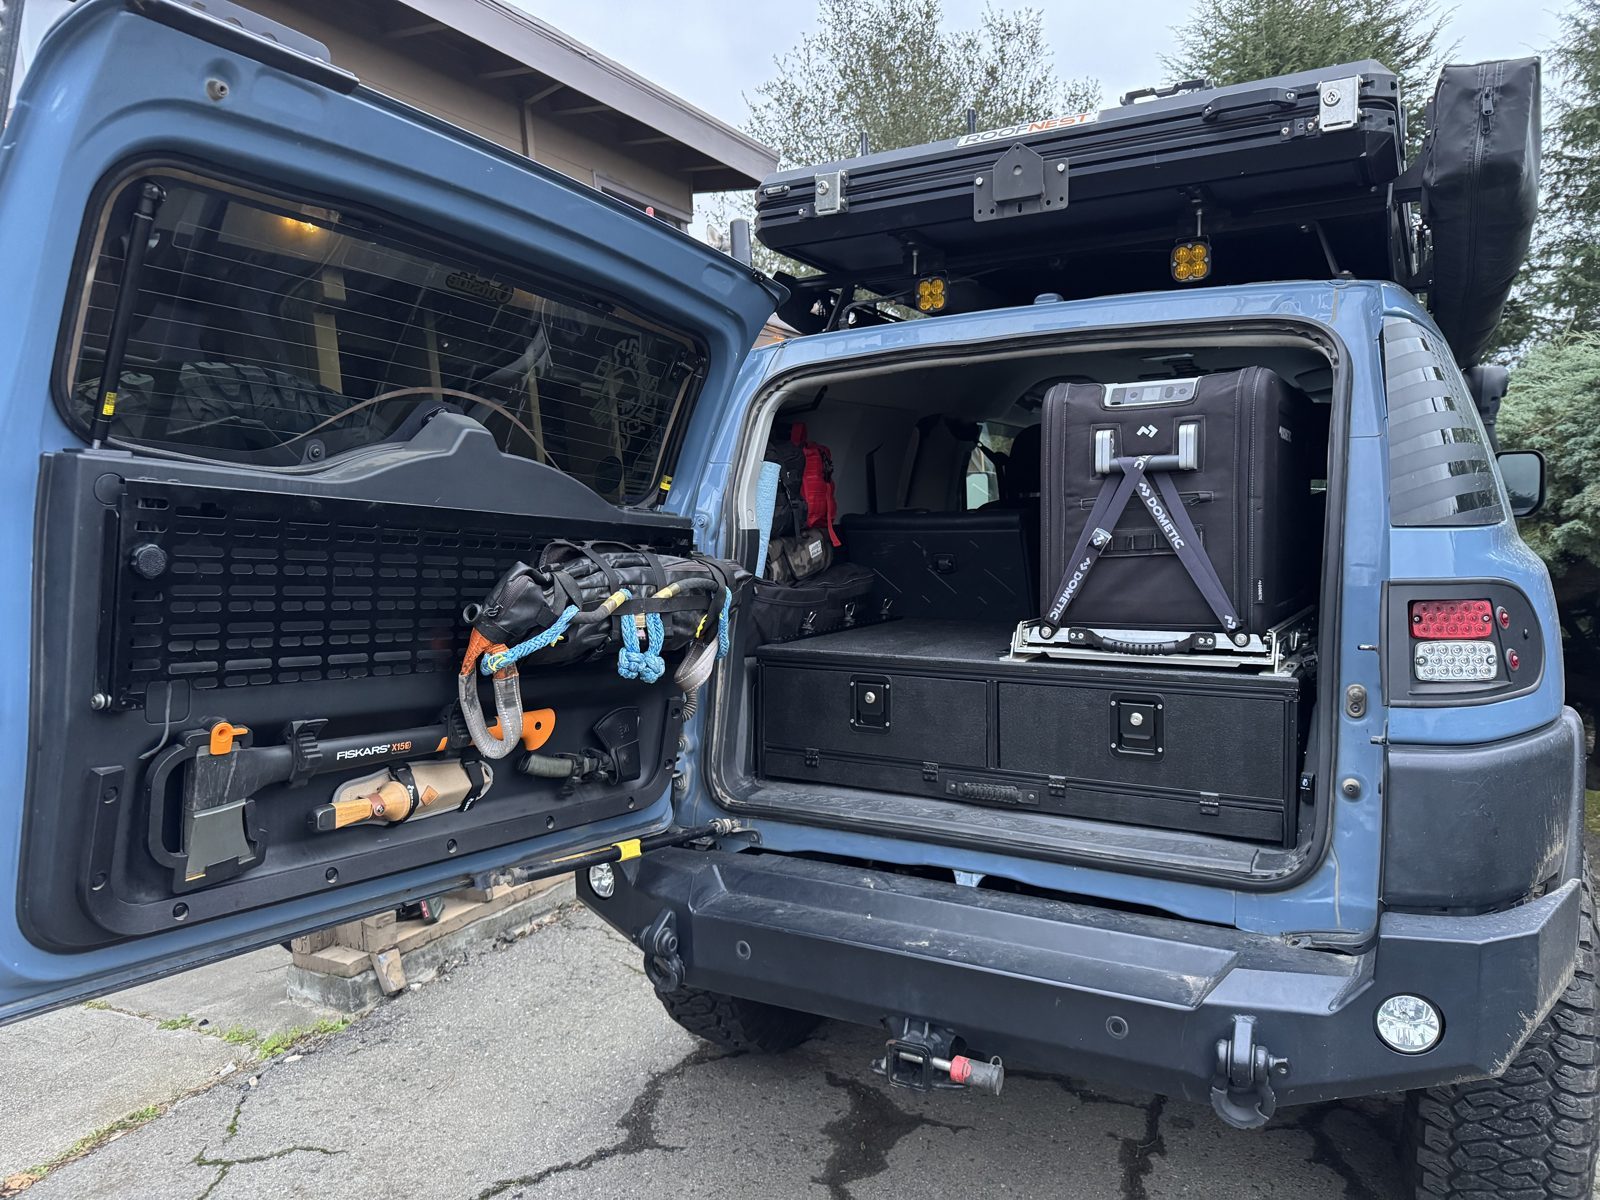
What the box is designed around
Every dimension in this build comes from four pieces of gear and the shape of the FJ's cargo bay. Settle these before you cut anything.
| Item | Where it lives | What it sets |
|---|---|---|
| Dometic CFX3 45, in its insulated cover | On top, driver side, on a tilting slide | Box height and fridge position: the taller the box, the farther the leaning seat backs reach into the bay, and the fridge has to sit behind them |
| Alu-Cab tilting fridge slide | Bolted to the top | Slide length, front to back: it sets how far forward the fridge sits; front tabs must clear the cargo door trim |
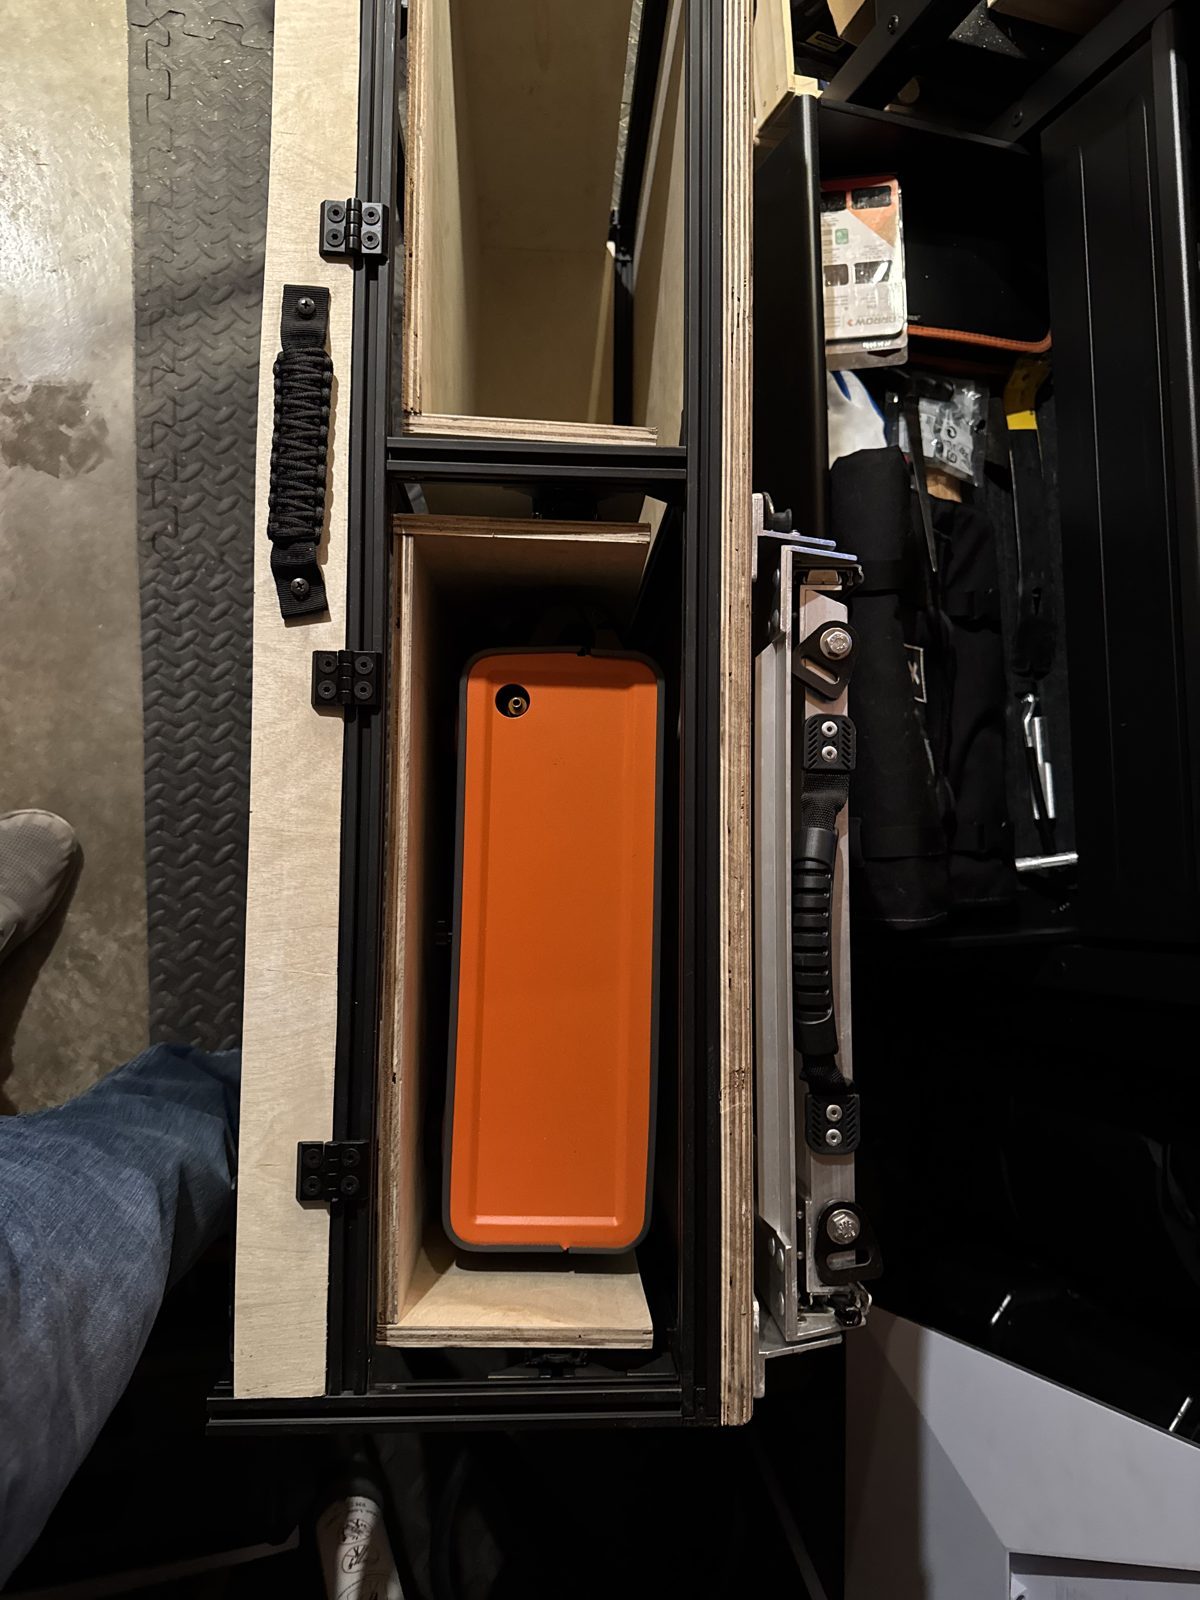
| Dometic GO camp table, bamboo | In the slot between the drawers and the top, face down, legs folded flat | Slot height, width and depth |
| Blackstone griddle | In one drawer | Drawer width and depth |
| Storage bins | On top, beside the fridge, strapped to L-track | Top surface area beside the fridge |
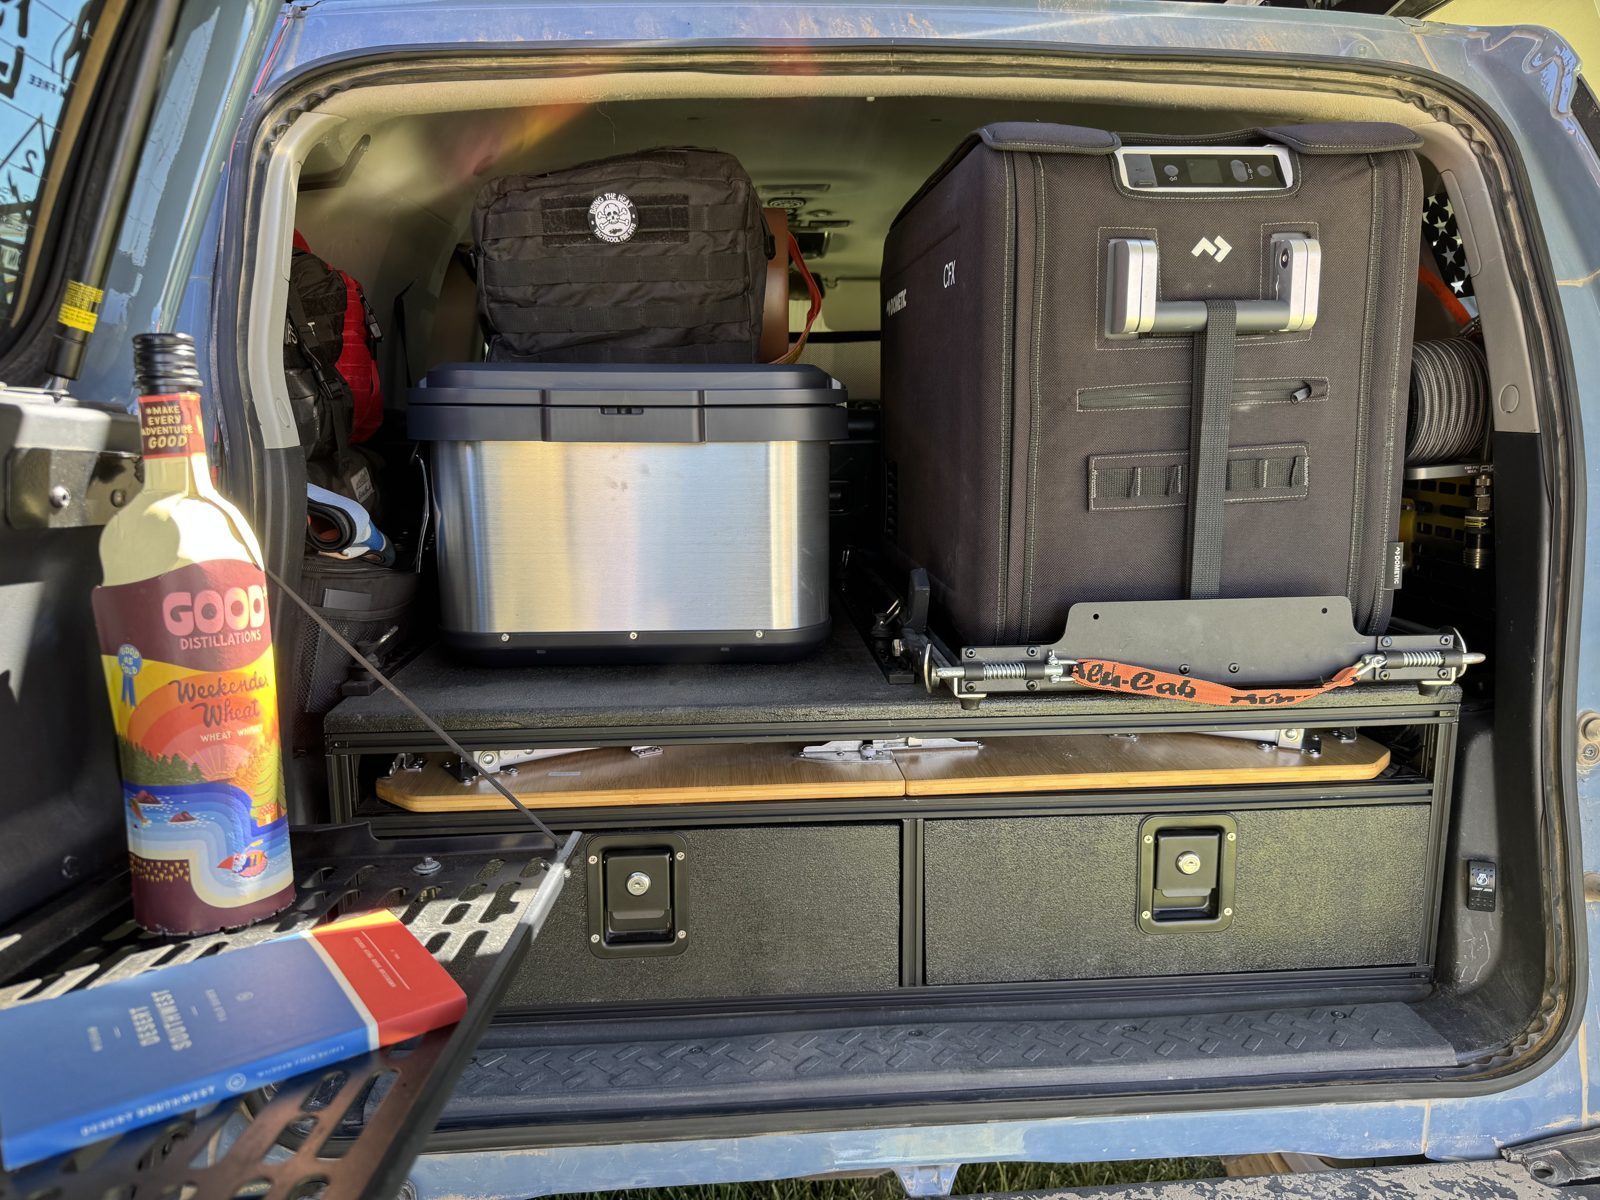
The cargo bay has three constraints that are easy to miss when measuring the floor:
- The rear seat backs lean rearward into the cargo bay, so the usable depth at the top of the box is about 2.5" less than at the floor. The front of the box, the drawer side, stays flat to match the flat of the cargo door; the seat-back side is where the box has to give.
- The cargo door trim intrudes at the rear when the door is closed. Anything that sticks forward off the top, like fridge slide release tabs, has to clear it.
- The four OEM tie-down bolt holes in the floor are the only anchor points. Nothing in this build drills the floor.
The table's stored size, open flat with the legs folded, is the number the slot is cut to. Dometic doesn't publish it; it's in the plans.
Design and dimensions
The extrusion box keeps the footprint of the plywood box it replaced and fixes the two things that box wasted: the 2.5" of depth behind the angled seat backs, and the 2" of dead air under it on feet.
The old box
The previous box was 3/4" plywood, 41" wide, 27" deep, 8.5" tall, on 2" feet. Two drawer openings, about 18.8" and 7" wide with a 1.5" divider. Its front face was square, so it had to be sized to clear the seat backs at the top, which left about 2.5" of floor unused in front of it. The fridge sat on a 29.25" x 19.75" platform on top.
The extrusion box
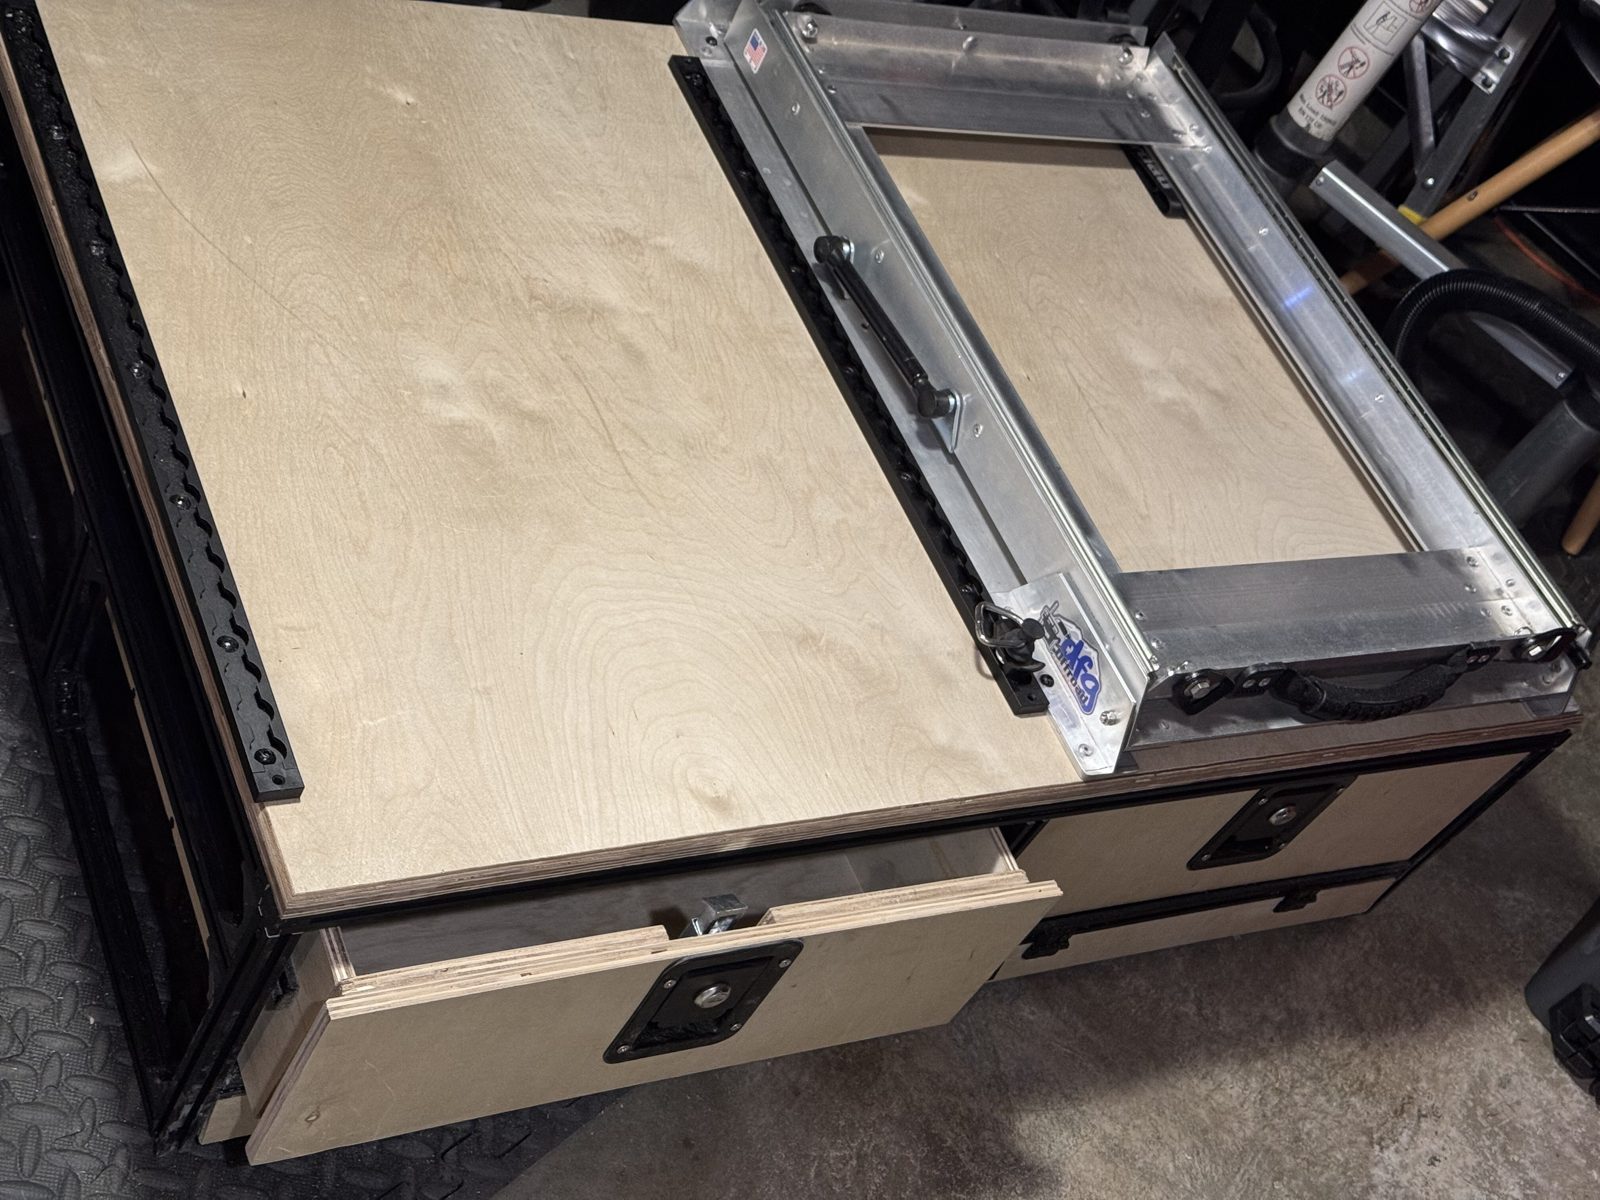
The design was modeled in Shapr3D, then reduced to a cut list and a sketch. The footprint is the old box's, 41" wide and about 29" deep, with a drawer level and, after the rebuild, a table slot above it. The back of the box follows the seat back angle; the front stays flat against the cargo door. The dimensioned drawings, the cut list and the as-built numbers are in the plans.
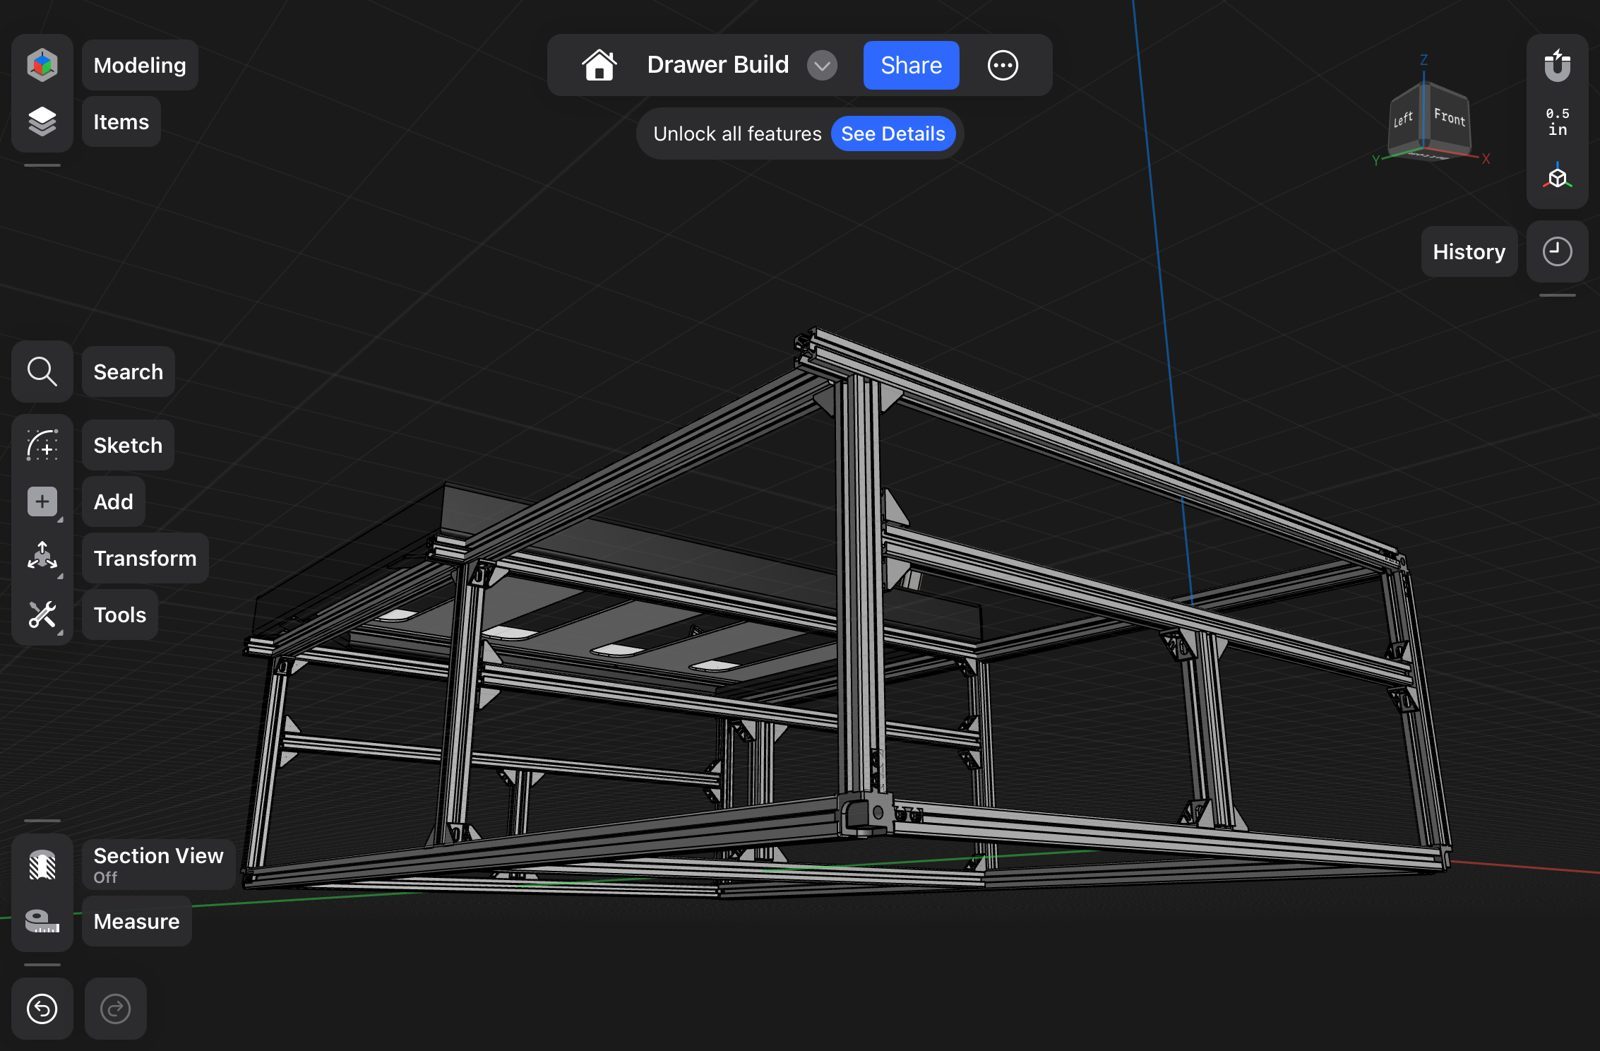
The one design mistake worth copying the fix for: the box height was set from the drawers and the slot, and where the fridge would sit on its slide was not checked against the seat back angle until the box was in the truck. The old slide no longer fit. Before you commit a height, draw the side view with the seat backs, the door trim and the fridge on its slide, extended, and check it against the headliner too. One sketch would have saved a $420 slide swap.
Materials and parts
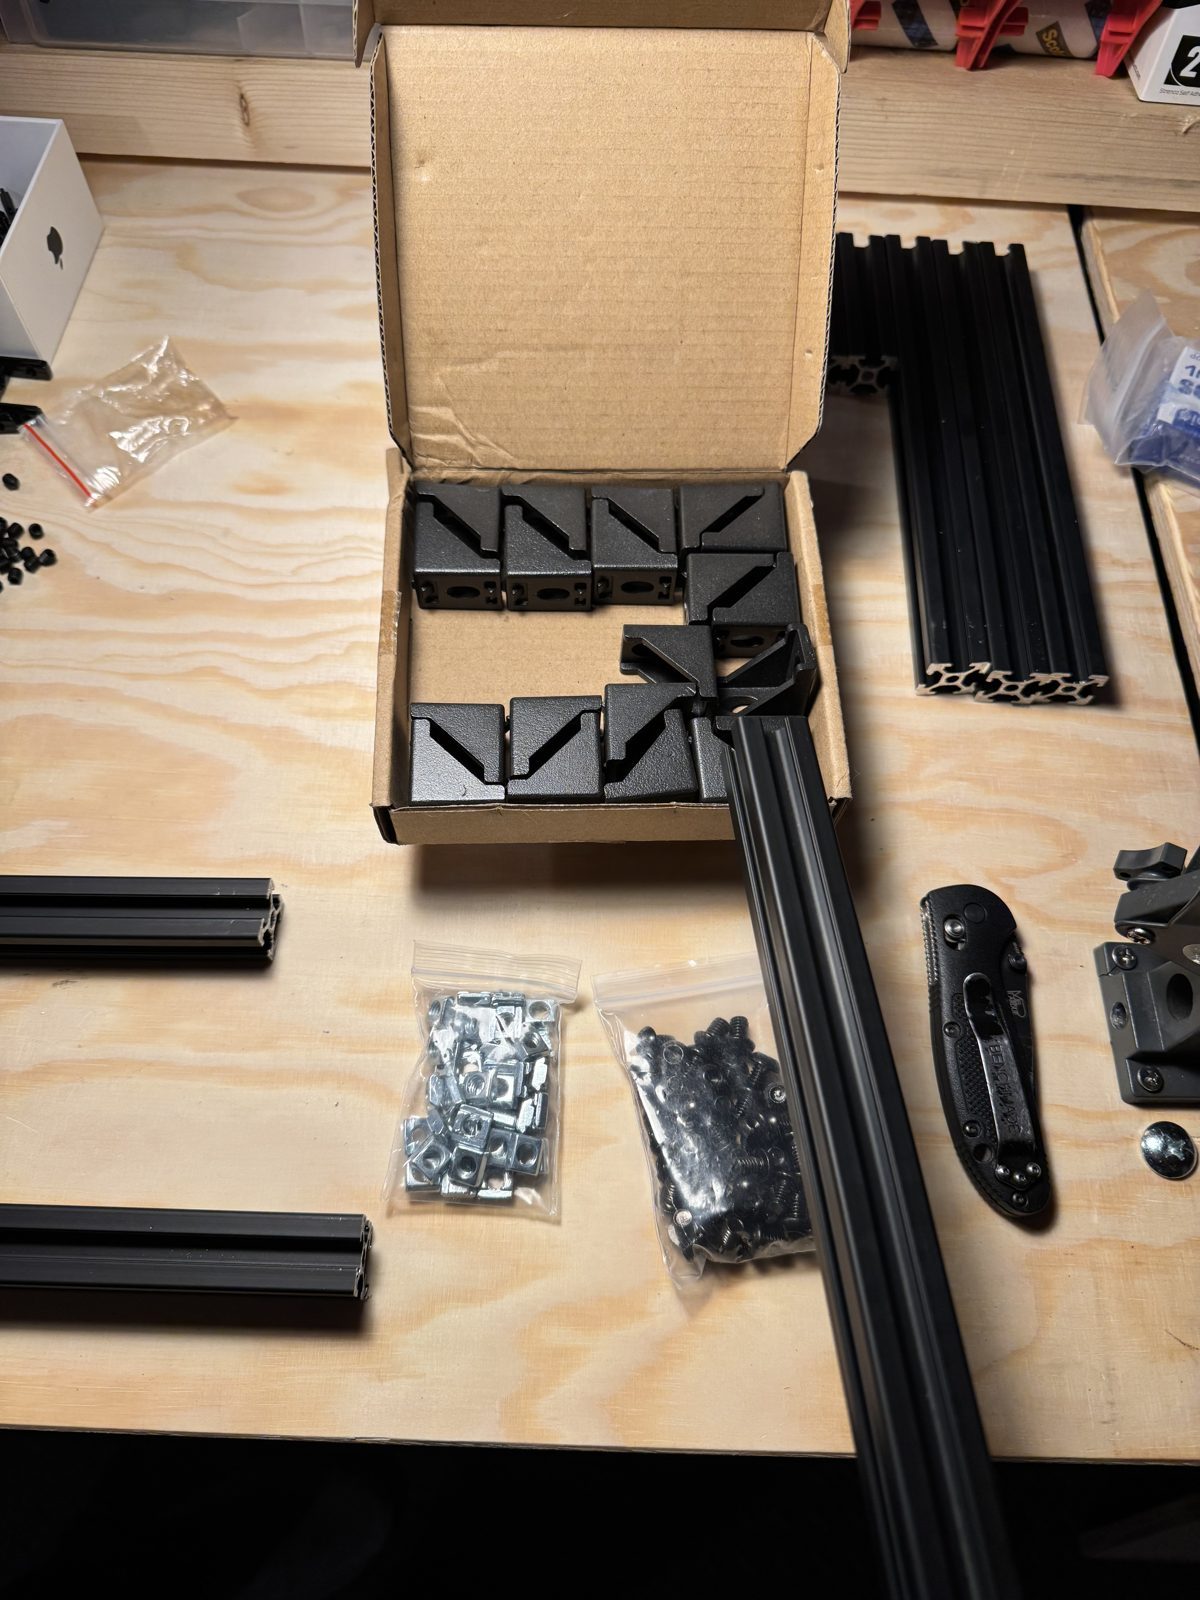
Everything structural is 2020 series aluminum extrusion with a 6 mm slot, black anodized, bought on Amazon. The original plan called for Vention's 22.5 mm system in blue anodized, which would have sat nicely against the FJ's paint, but the price and the shipping lead time pushed it to black 2020. That decision also means every connector in this list is a generic 2020 part you can get from a dozen sellers. The table describes each part by what it has to do; the exact brands this build used are at the end, but any equivalent will work.
| Part | What to look for | Role |
|---|---|---|
| 2020 aluminum extrusion, 6 mm slot, black | T-slot, 6 mm slot, 48" lengths, all from one listing | Frame |
| 3-way corner connectors for 2020 | solid, end-mount type | Outside corners |
| 2020 corner brackets with T-nuts and bolts | M5 or M6 kits, 20 to 30 per pack | Gussets at every joint |
| Interior L-joints for 2020, hidden | with M5 grub screws | Joints where a gusset would show |
| Slide-in T-nuts, M6, 2020 | 6 mm slot, not 8 mm | Mounting slides, L-track, latches |
| Hinges for 2020 extrusion | alloy, 2-piece | First-build table flap only |
| Slotted steel L brackets | steel, 3 slots | Front floor anchors |
| Eye bolts, M6, stainless | shoulder type | Rear tie-down |
| Turnbuckles, M10, stainless | hook and hook | Rear tie-down tension |
| Birch plywood, 3/4" | one 36" x 48" panel or offcut | Top and drawer fronts |
| Birch plywood, 1/2" | two 24" x 48" and two 24" x 24" panels, or one half sheet | Drawer boxes |
| Drawer slides, 24" | full extension, soft-close, side mount, 100 lb rating | Drawers |
| Flush paddle latches | stainless, travel-trailer compartment type, keyed alike | Drawer fronts |
| L-track | 24", black anodized, rectangle profile, with end caps | Top, beside the fridge |
| Truck bed coating, roll-on | black, quart cans | Top and drawer fronts |
| Texture roller kit | roller, textured covers, tray, chip brushes | Applying the coating |
| Black spray paint | general purpose | Base coat on all plywood |
| Paracord grab handle | Jeep rear-window style | Flap pull, later carry handle |
| Tilting fridge slide | shortest front-to-back length that fits your fridge | Fridge |
A few notes on the choices:
- Project panels instead of a full sheet. Pre-cut birch project panels arrive flat, fit in a car, and a 36" x 48" 3/4" panel is big enough for the 29" x 41" top with the drawer fronts out of the offcut. They cost more per square foot than a 4x8 from the lumber yard. The plan said 12 mm Baltic birch; project panels are what actually got bought.
- One series, one slot, one seller. Every bracket, T-nut and connector in this build is sized for 2020 T-slot with a 6 mm slot. Buy all the extrusion from the same listing, first build and any rebuild, so the slot profile matches and the brackets seat the way they should. Mixing listings is how you end up with a bag of hardware that almost fits.
- Keyed alike latches. One key for both drawers. Check this before ordering, since many two-packs are keyed different.
- Soft-close, 100 lb slides. The griddle drawer is heavy, and soft-close matters on a drawer you open with the truck parked on a slope.
Frame assembly
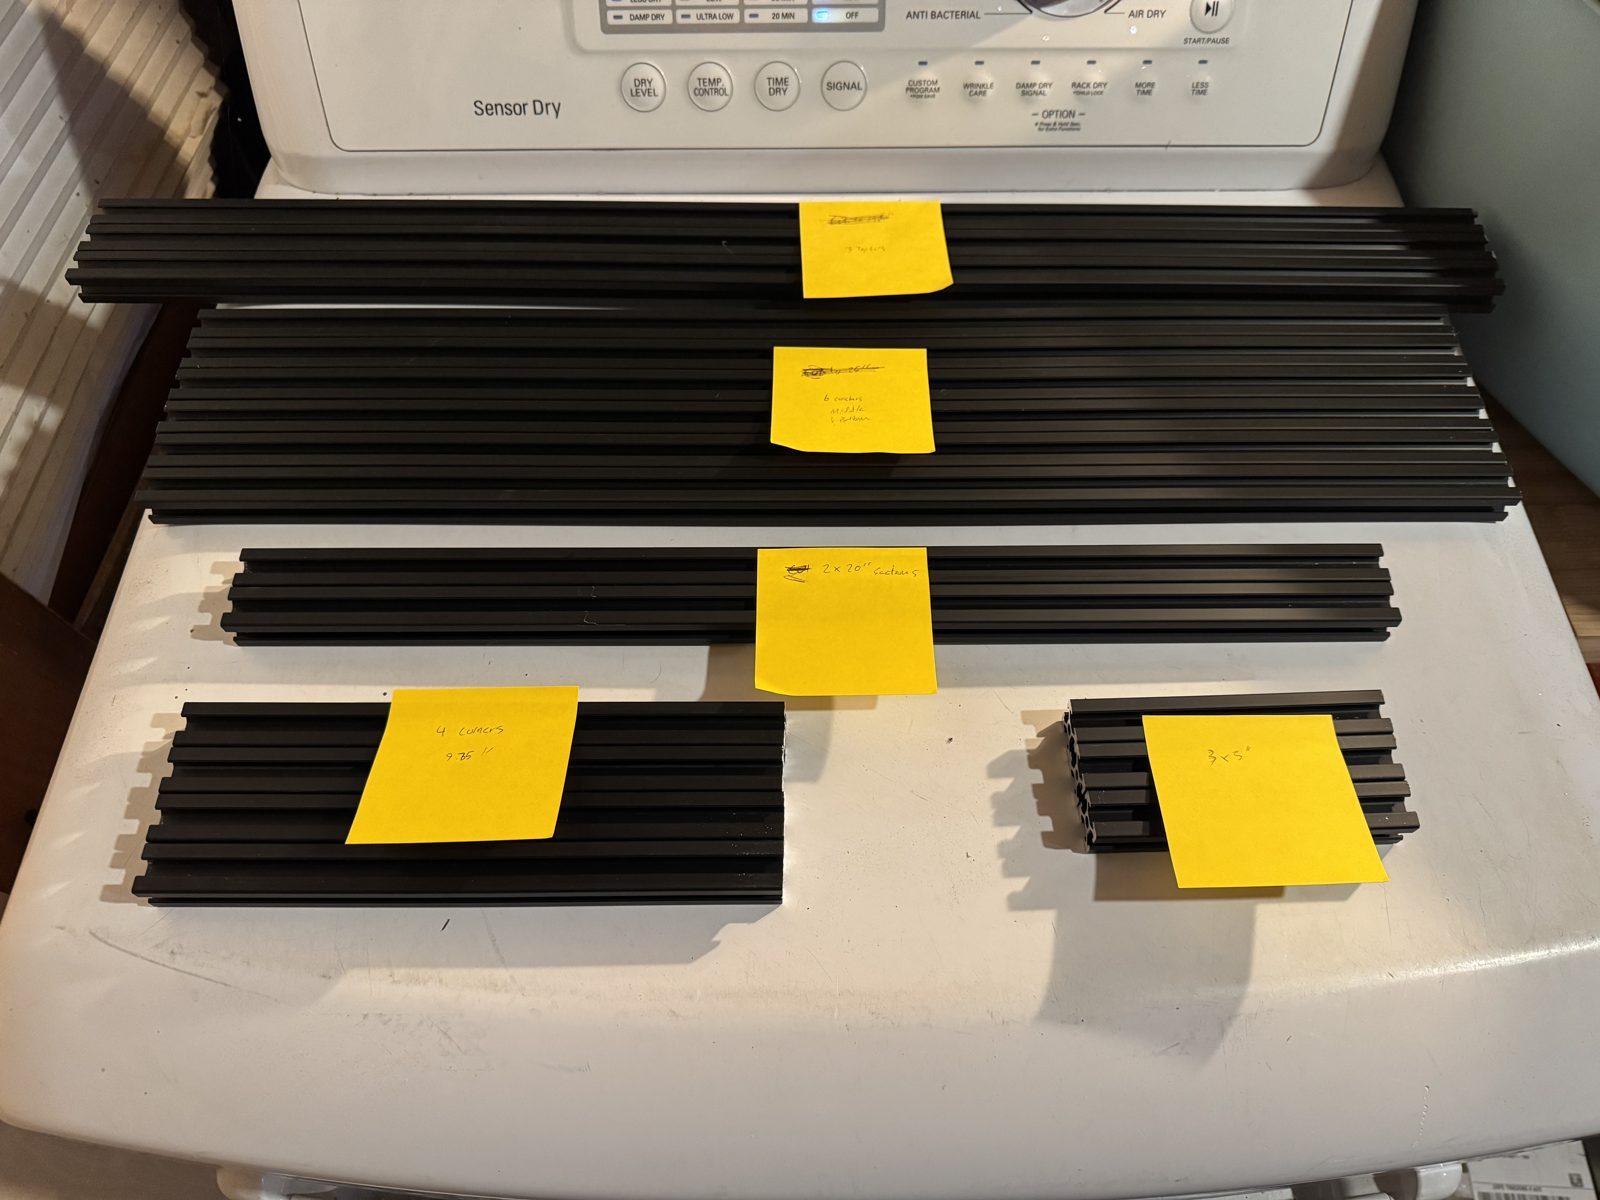
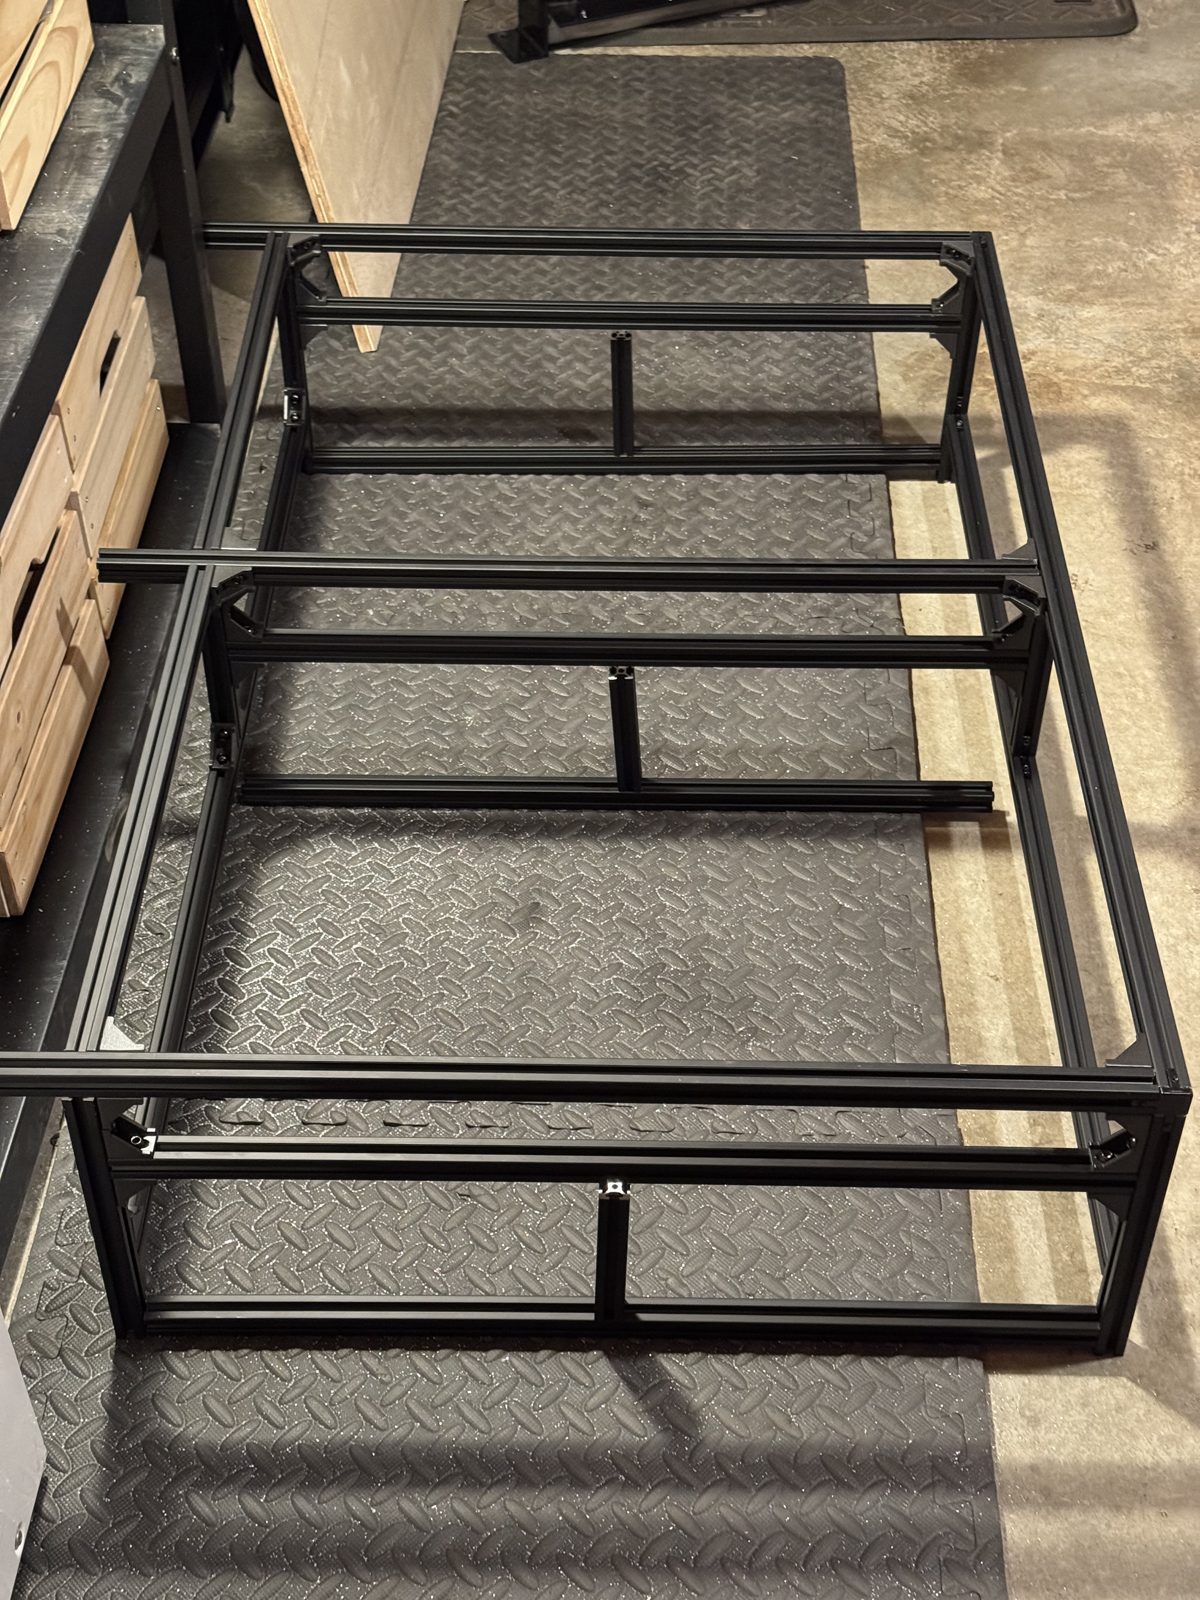
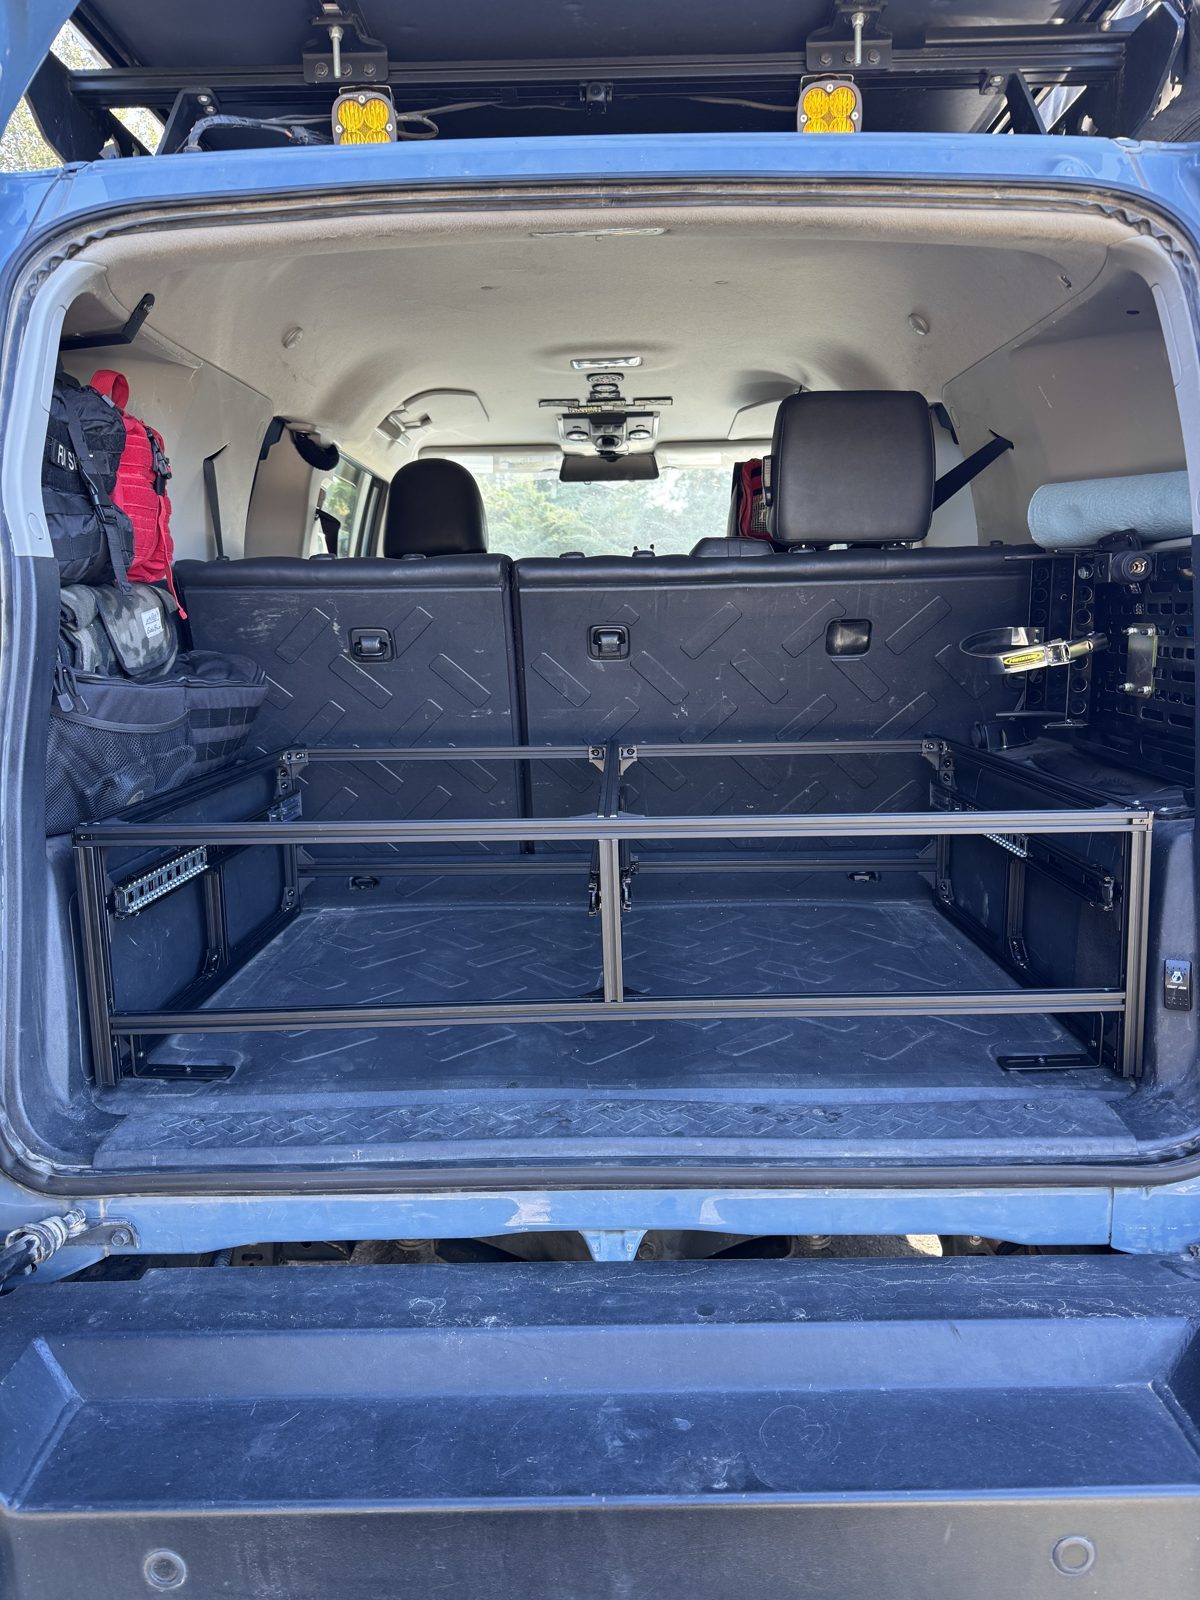
The frame is a rectangle of extrusion with a second horizontal level for the drawer supports and a divider down the middle. It went together on the bench in an evening. It cuts from a short list of lengths, builds as two side frames flat on the bench, then stands up and joins with the cross rails before the drawer level and the center divider go in. Cut with a portable bandsaw (a miter saw with a non-ferrous blade or anything similar works too), deburr the ends with a file, and label every piece with a sticky note naming its position; the notes in the photos are why nothing went in backwards. Square the frame by measuring diagonals, snug every T-nut bolt, then go around once more with everything in place, because extrusion frames loosen as you handle them. Then carry it to the truck for a test fit against the seat backs and the door trim before any plywood is cut. The cut list, the joint-by-joint connector map and the full assembly sequence are in the plans.
Drawer boxes
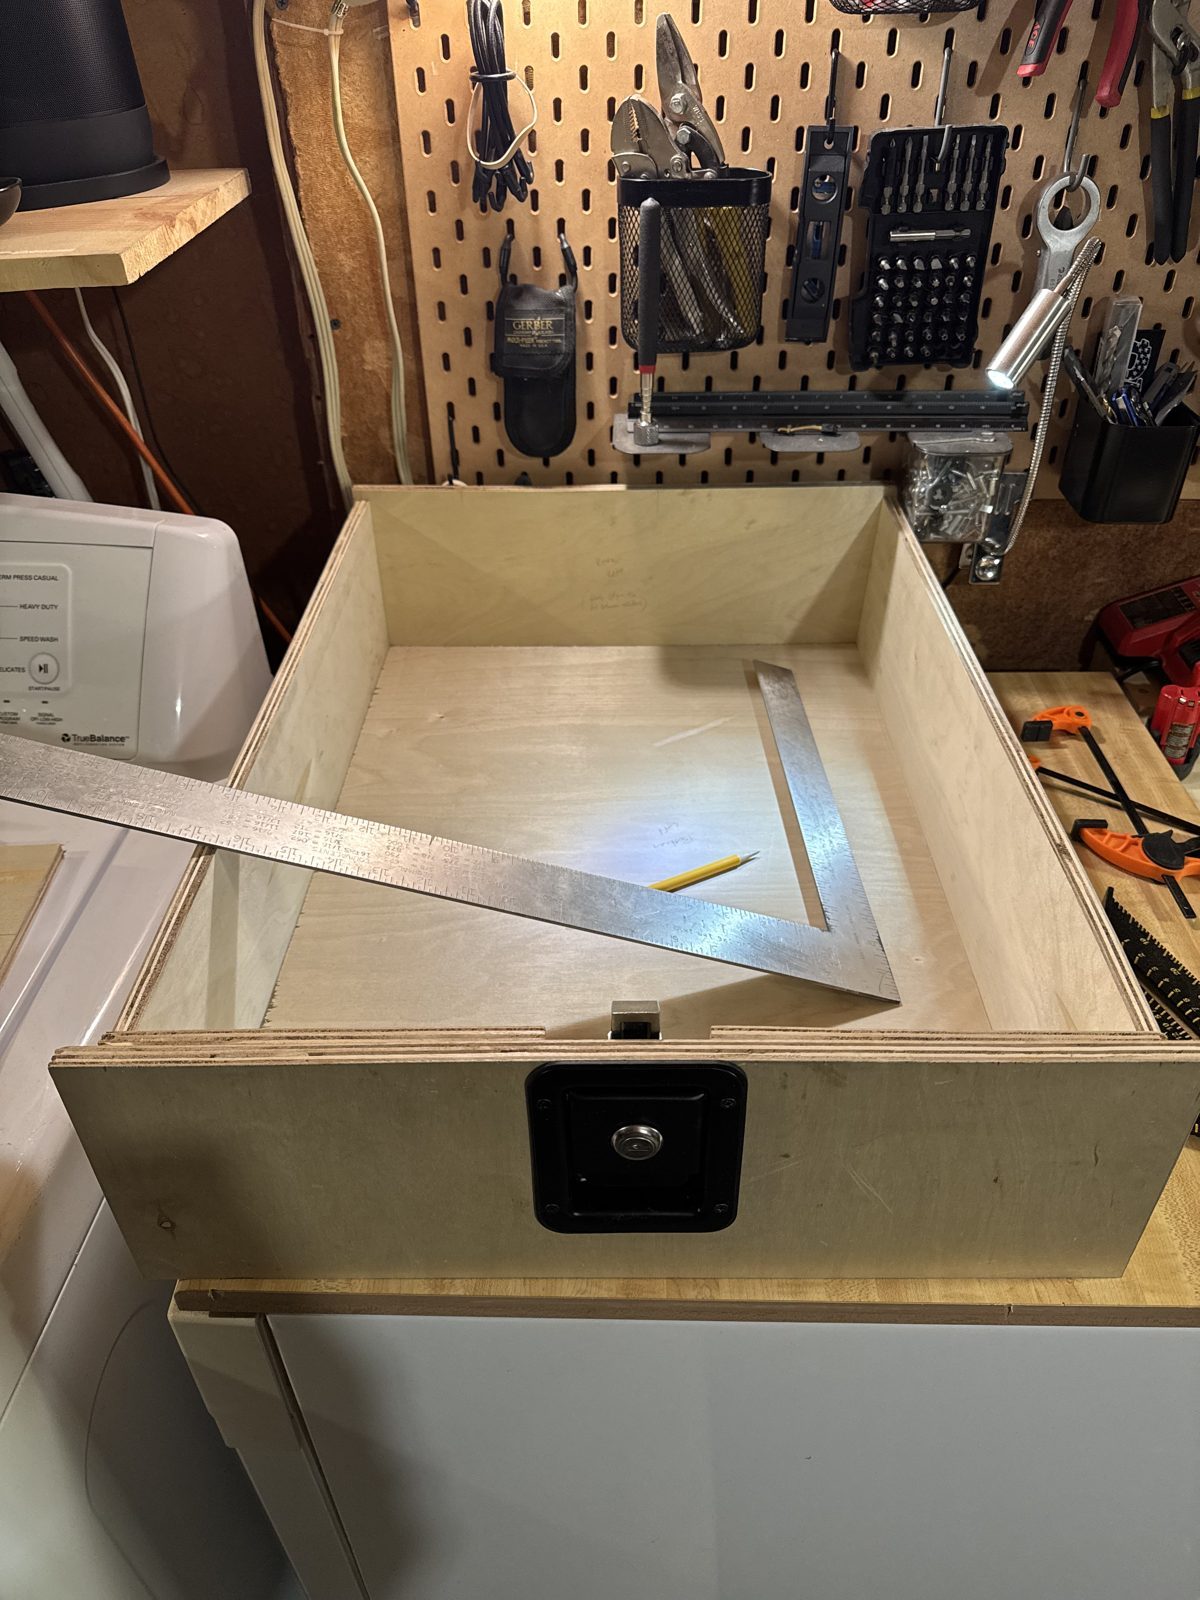
The drawers are 1/2" birch plywood boxes with 3/4" birch fronts, glued and screwed, each on a pair of 24" slides. They were meant to be something else.
What was planned
The original idea was ABS sheet for the sides and back, slid into the extrusion channels so the extrusion itself formed the drawer frame. That got as far as ordering a 1/8" sheet of black aluminum composite panel (ACM, 24" x 36") as the better-looking version of the same idea. ACM is a thin polyethylene core between two aluminum skins, the stuff signs are made of.
It snapped in the finger brake on the first bend. ACM won't take a sharp fold; the skin cracks and the core tears. The way to fold it is to rout a V-groove on the back through the rear skin and most of the core, then fold by hand along the groove. That wasn't known at the time, and it was late December with a trip coming.
What got built
Three 1/2" birch panels were ordered the same week the ACM failed, and the drawers became plain plywood boxes "for now." For now is approaching two years. The plywood has held up, and the aluminum revisit hasn't happened. The boxes are sides, back and bottom in 1/2" birch, glued and screwed with the bottom captured in the sides. The fronts come out of the top panel's offcut, with the paddle latch recess cut by jigsaw and chisel. Slides go on the box first, then on the frame with the box in place for alignment, through M6 T-nuts. The drawer dimensions, the slide positions and the latch recess template are in the plans.
Griddle drawer
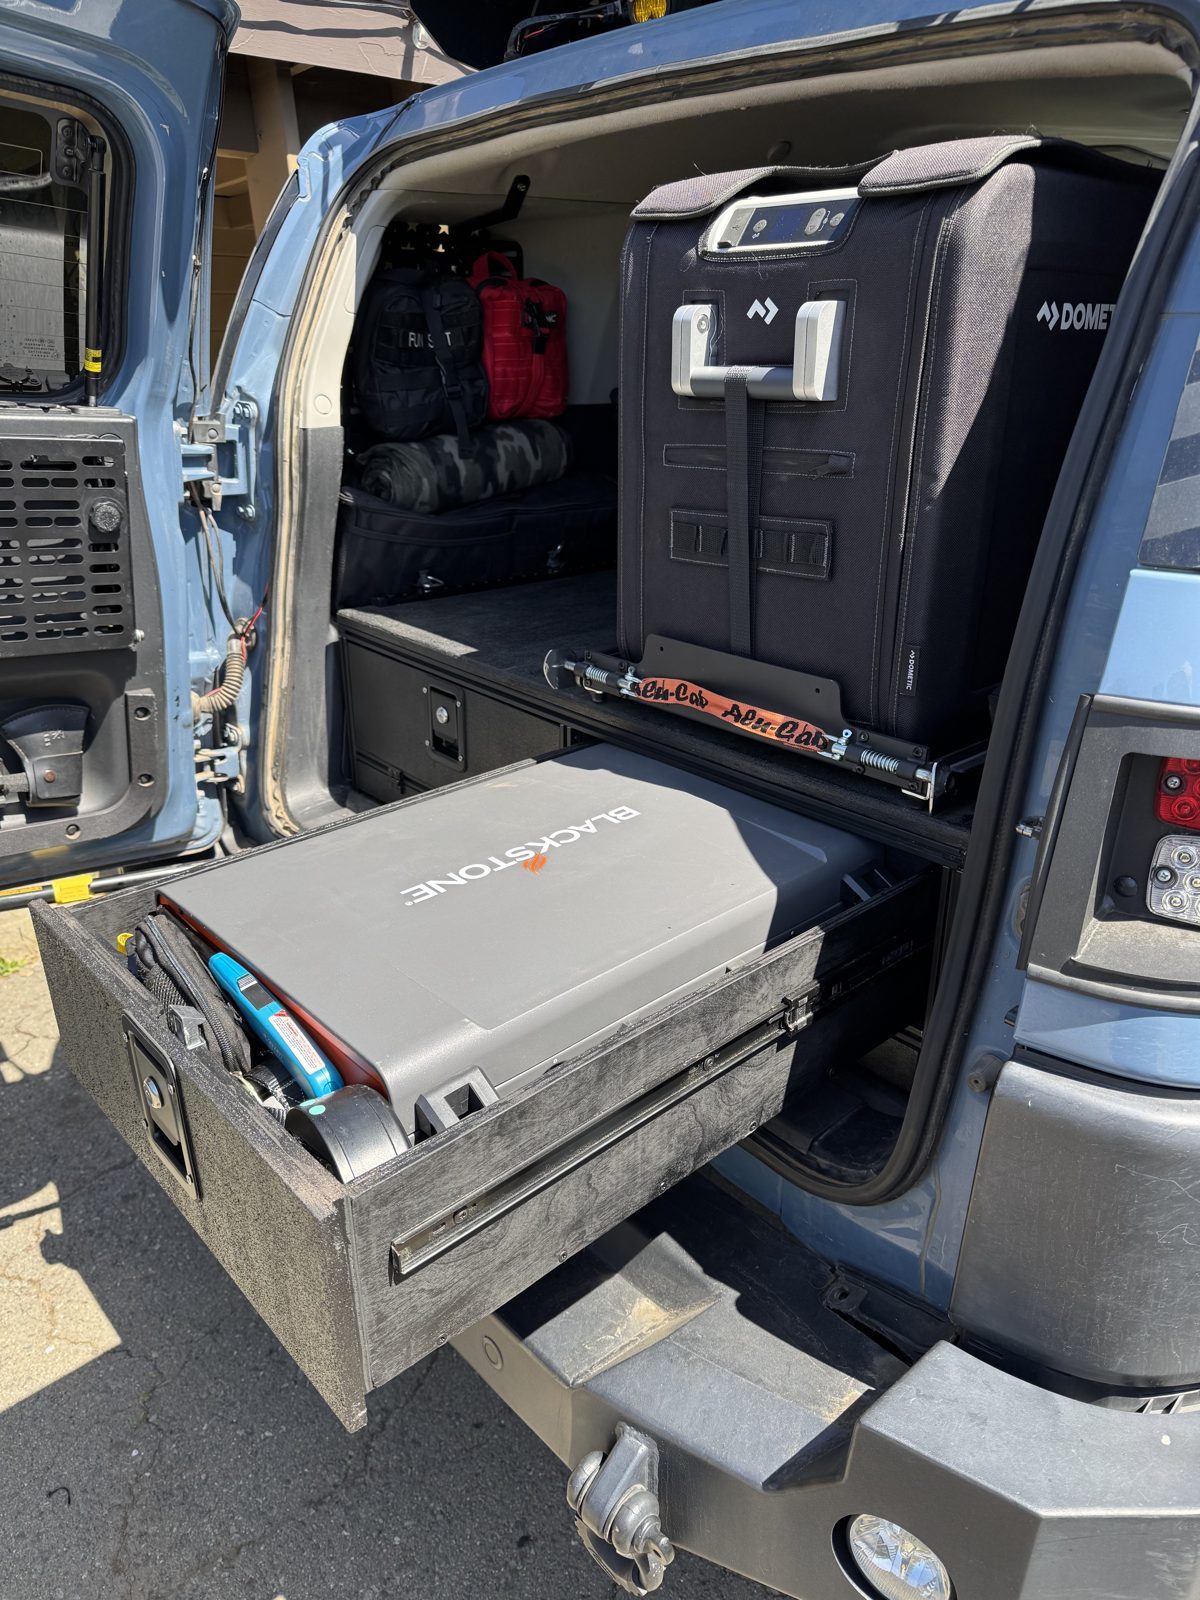
One drawer is sized for the Blackstone griddle and carries it on every trip. If you're copying this for a different stove, measure it with the lid and handle before setting the drawer depth.
Slides, latches and handle
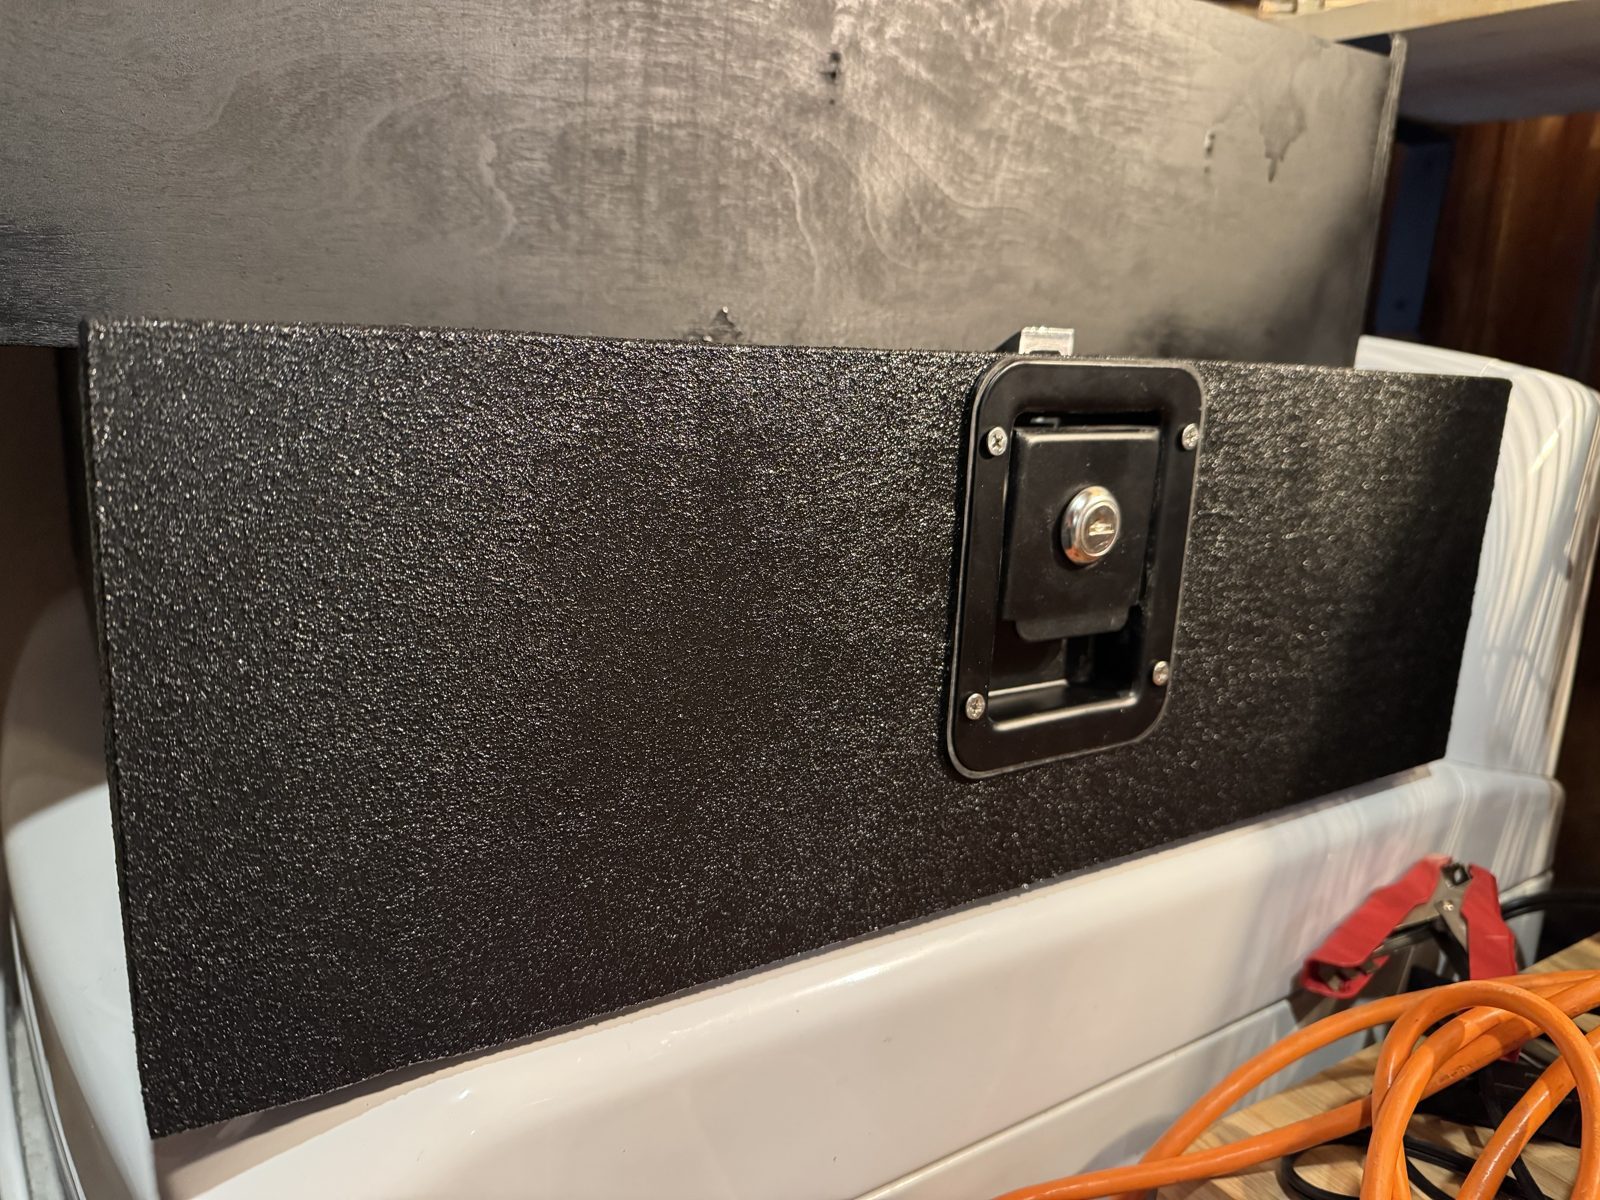
The hardware is two pairs of 24" full-extension soft-close slides, two flush paddle latches keyed alike, and a paracord grab handle on the frame face.
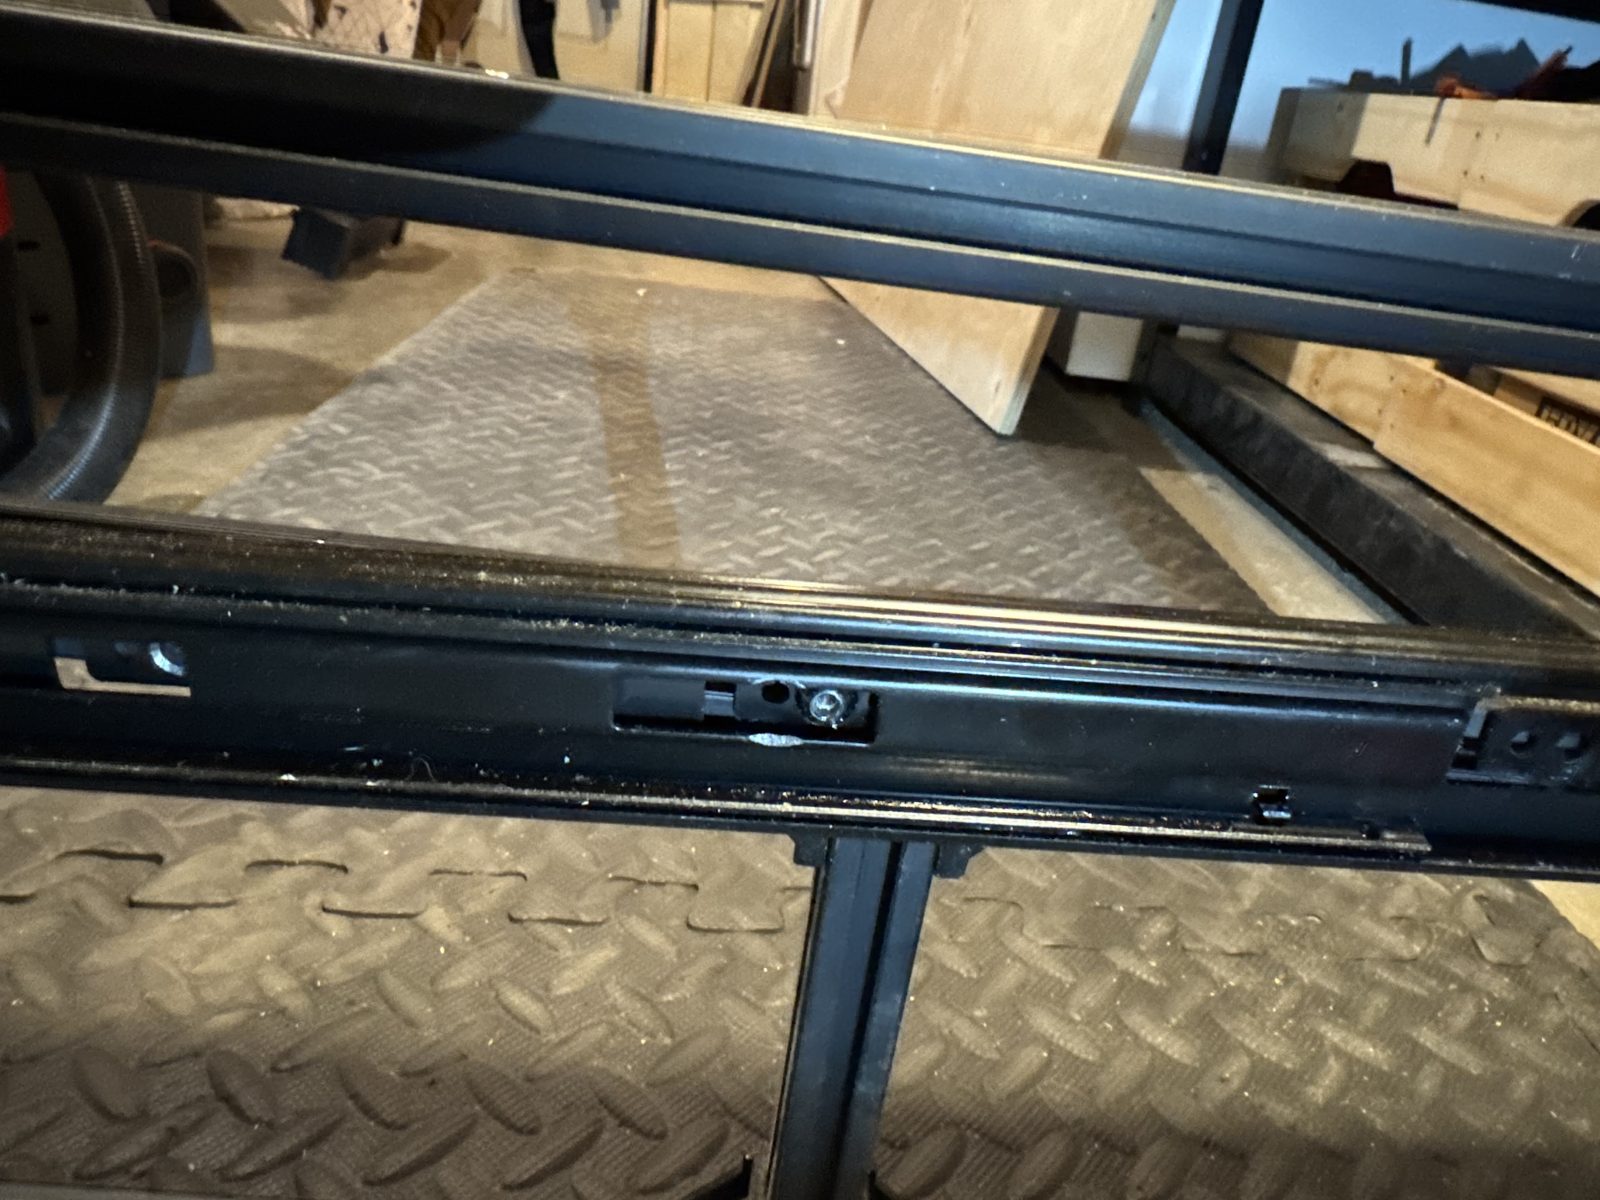
- Slides: 24" soft-close, three-fold full extension, 100 lb per pair, side mount. Full extension matters because the box sits 27" deep and you want to reach the back of the drawer from the tailgate. Soft-close keeps a loaded drawer from slamming when the truck is nose-down. Mount them level to each other with a spacer block; a slide pair that's out of parallel by a few millimeters will bind at full extension.
- Latches: flush-mount stainless paddle latches, the travel-trailer compartment type, with a cam that catches the frame rail behind the drawer front. Keyed alike, so one key opens both. They sit in a recess cut through the 3/4" front and are the only thing holding a drawer closed on washboard, so check the cam engagement with the drawer loaded.
- Handle: a paracord grab handle of the kind sold as a Jeep rear window grip, mounted low and centered on the front face. In the first build it was the pull for the hinged table flap. It stayed on after the rebuild as a handle for dragging the box when it's out of the truck.
Top surface and L-track
The top is a single 29" x 41" panel of 3/4" birch, bolted down to the top rails through T-nuts. The fridge slide bolts through it on the driver side. The remaining area, roughly the passenger half, is where bins and loose gear ride.
Two 24" runs of L-track are screwed to the top on that side, with plastic end caps. Bins strap to the track with standard L-track fittings, so the load beside the fridge is tied down rather than wedged. The track also gives a hard point for a strap over the fridge cover when the slide isn't latched.
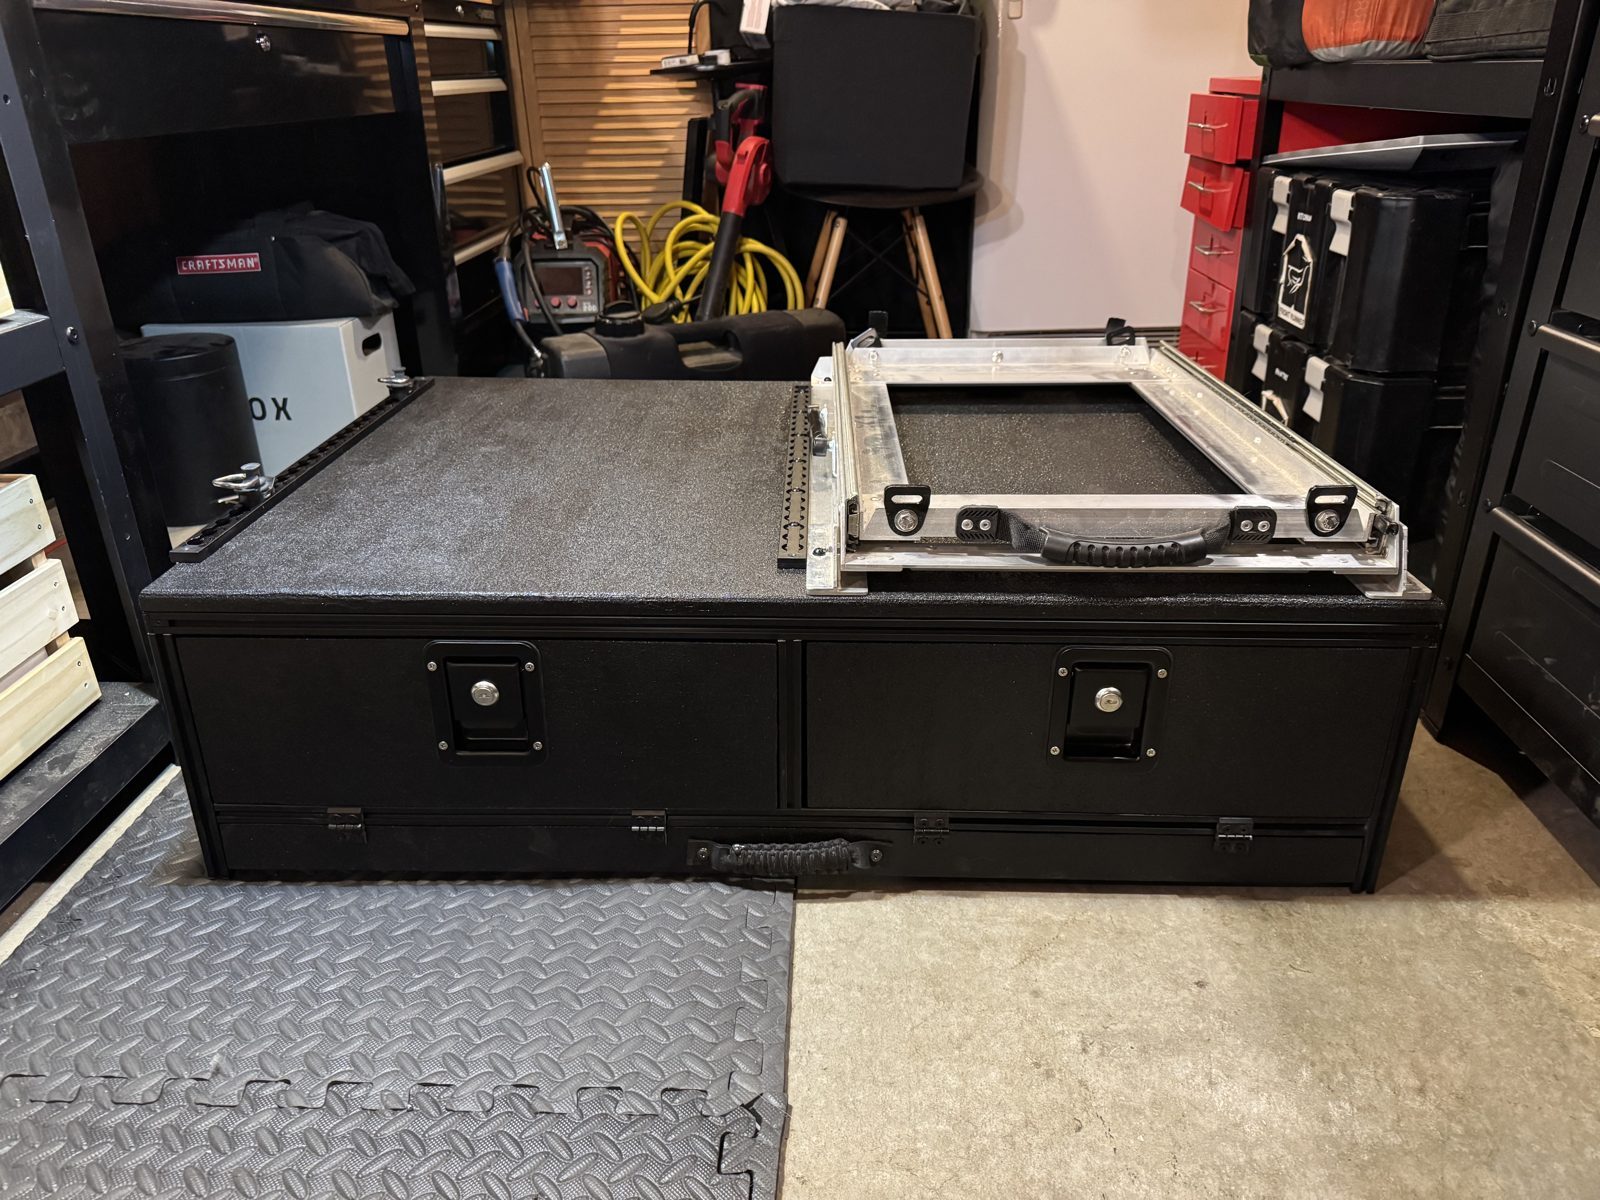
In the first build the top was a plain panel. The rebuild kept the same top and moved the table slot underneath it, so the top now spans the slot level as well as the drawers.
Finish
The finish is a rolled-on truck bed coating over black spray paint, and it's the cheapest part of the build that most changes how it reads. Two quarts of roll-on truck bed coating and a texture roller kit, about $80, got the top and drawer fronts to a surface close to a Goose Gear box.
- Spray every plywood part black first, all faces and edges. This seals the wood and means any thin spot in the texture coat still reads black.
- Roll the truck bed coating onto the top and the drawer fronts only, with the textured roller cover from the kit. Chip brushes for edges and the latch recesses.
- Build it up in several coats, letting each flash off, until the texture looks even. The first coat looks thin and patchy; keep going.
- Leave the drawer box interiors and the slot panels at spray paint. Texture inside a drawer collects dirt and scuffs off gear, and nobody sees it.
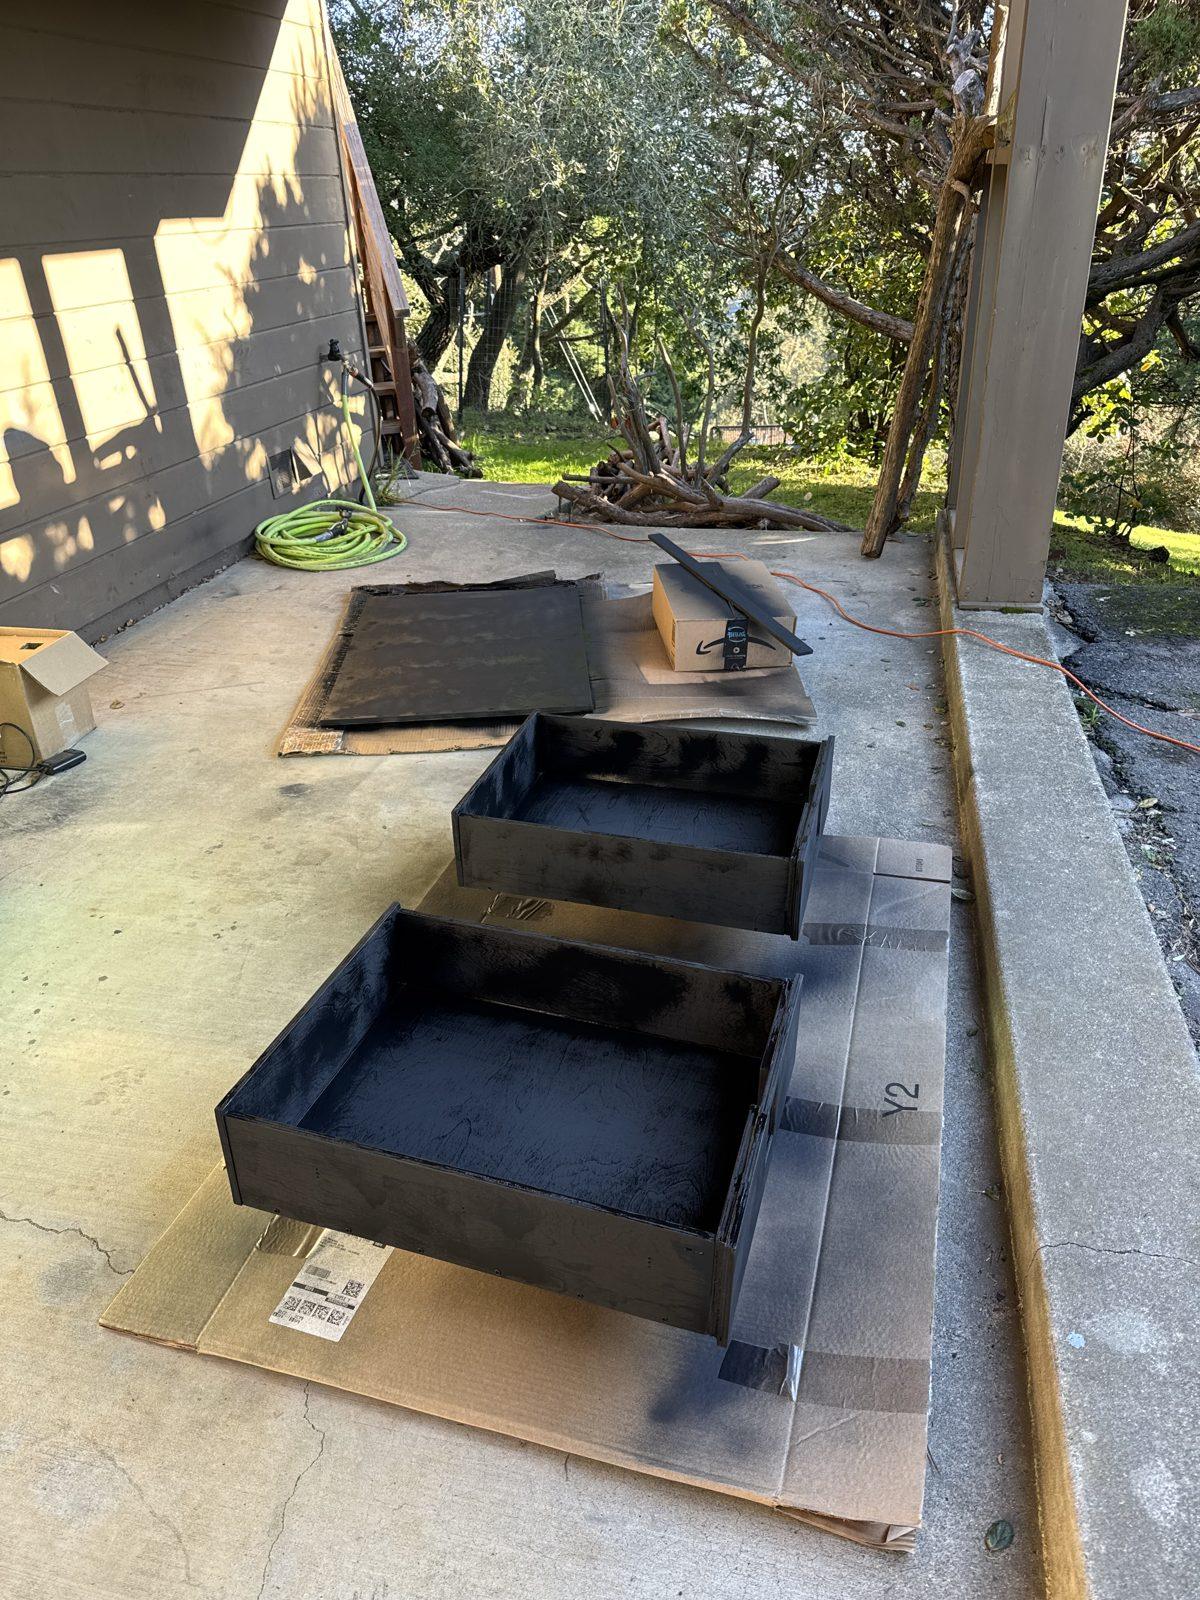
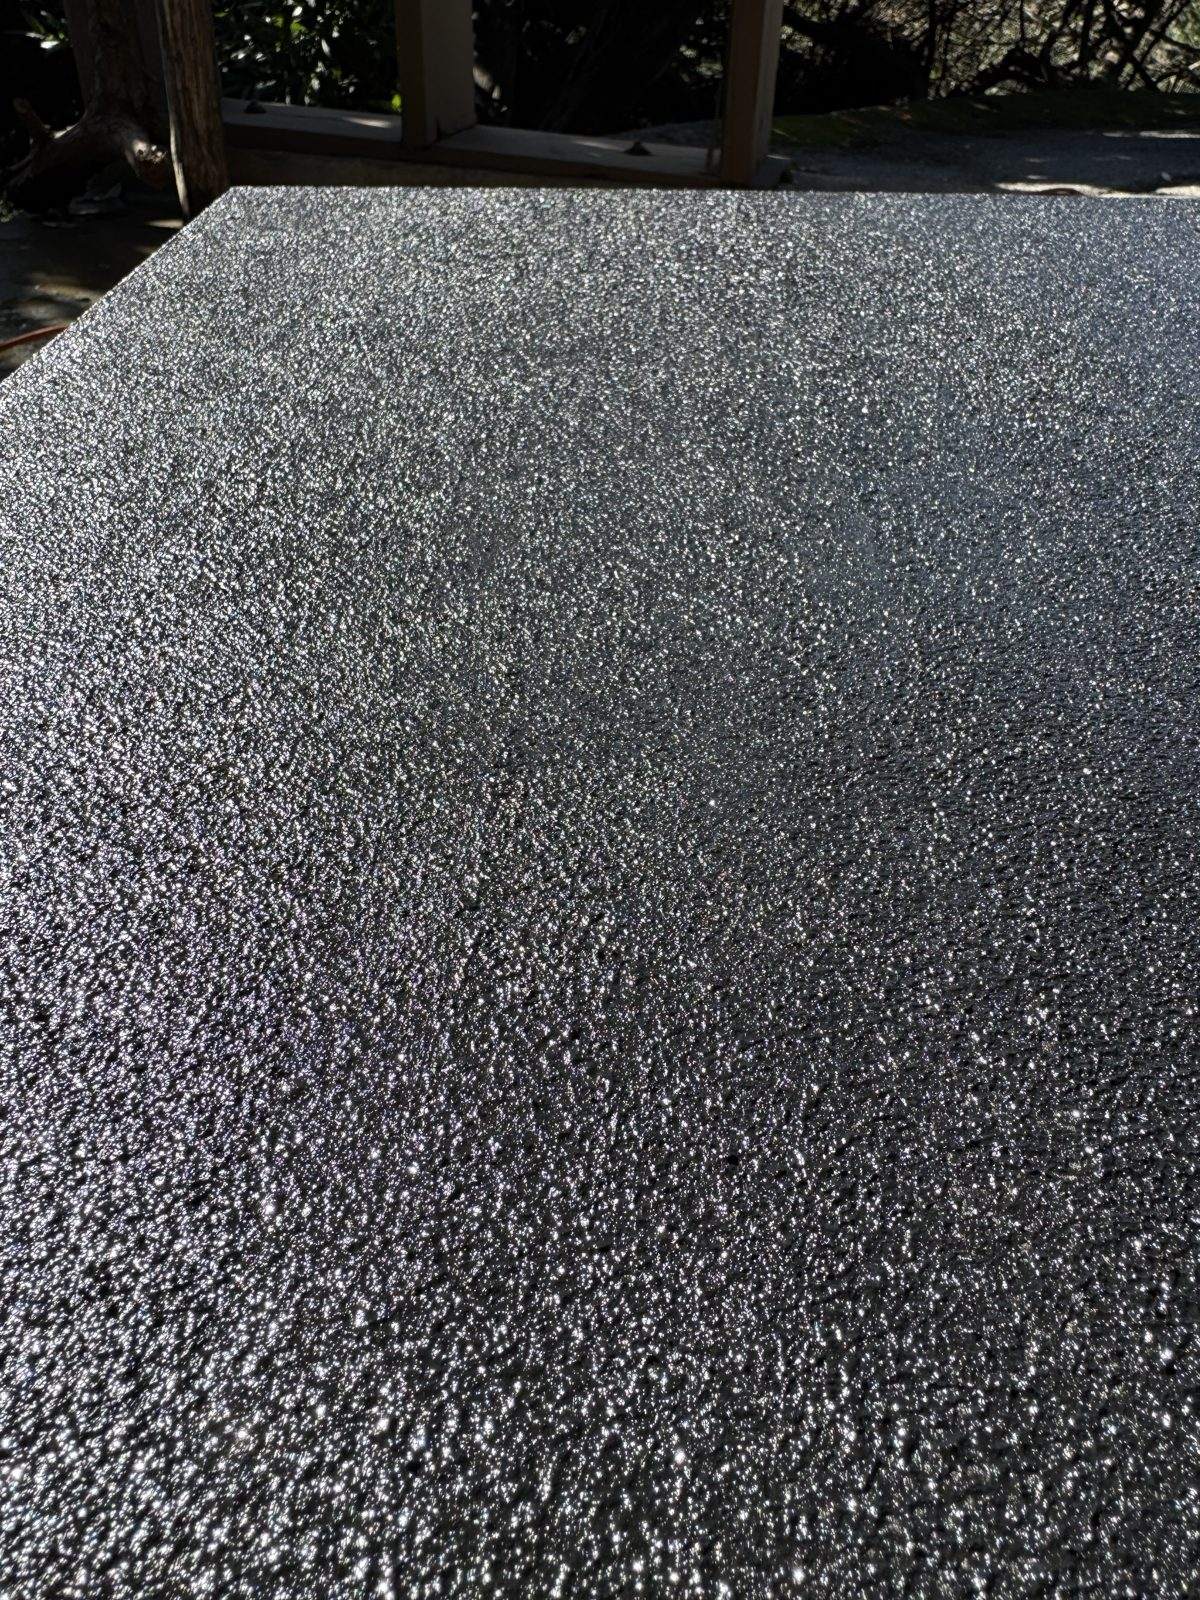
Do the coating outdoors on cardboard. It's thick, it drips, and the texture is sensitive to how fast you roll, so test on an offcut first to find the pace that gives the pattern you want.
Install and tie-down
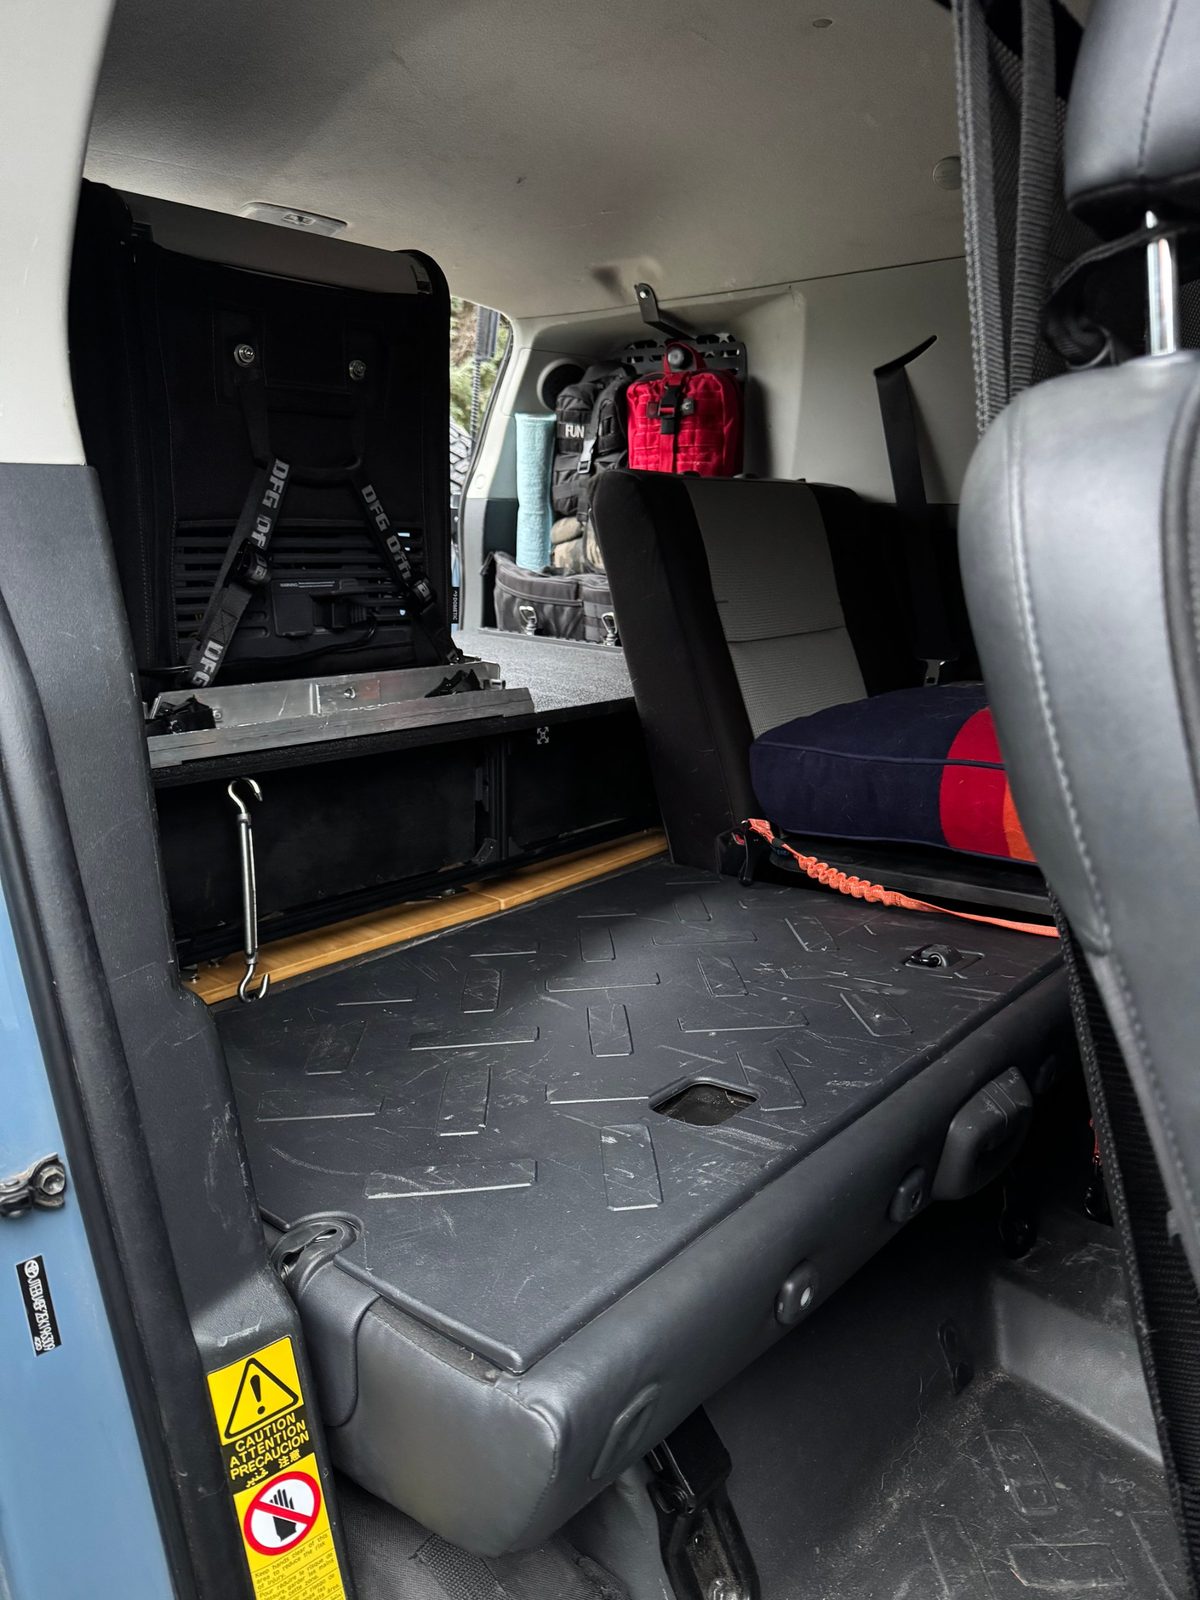
The box bolts to the FJ through the four factory tie-down holes in the cargo floor. Nothing is drilled.
The front two anchors are slotted steel L brackets, bolted to the bottom rail of the frame through T-nuts and down into the OEM holes. The slots in the bracket absorb the mismatch between where the extrusion wants to sit and where Toyota put the holes.
The rear two anchors work differently. The factory tie-down rings come out. M6 stainless eye bolts thread into the top rear rail of the frame, and M10 hook-and-hook turnbuckles run from those eyes down to the rear floor points. Tightening the turnbuckles pulls the top rear of the frame down and back against the floor, which is the direction a loaded box wants to move under braking. Bracket positions, the bolt specs and the tie-down hardware list are in the plans.
Install order:
- Build the box complete on the bench: top, slides, drawers and fridge slide all go on outside the vehicle, where it is far easier. A test fit of the bare frame and top in the truck before any drilling is worth doing.
- Set the finished box in place and attach the front L brackets loosely.
- Fit the rear eye bolts and turnbuckles, take up the slack, then tighten the fronts.
- Tension the turnbuckles until the frame doesn't rock, and check that the back of the box still clears the seat backs.
The whole box comes out by backing off two turnbuckles and two bolts, which is how it got pulled for the rebuild.
Fridge slide swap
The extrusion box stands taller than the plywood box it replaced, and that height came out of the fridge slide.
On the old box the CFX3 45 rode a DFG Offroad slide-and-tilt, a $420 piece that worked well. On the new box the same slide no longer cleared the rear seat backs: the fridge now sat higher, where the seat backs lean farther into the bay, and the DFG slide is long enough front to back that the fridge's front edge landed in them. The box height had been set from the drawer level and the table slot without checking where the fridge would end up against the seats.
The fix was a shorter slide, not a lower box. The Alu-Cab tilting fridge slide does the same job, slide out and tilt down, in less length front to back, so the fridge sits farther rearward on the top. That moved it clear of the seat backs.
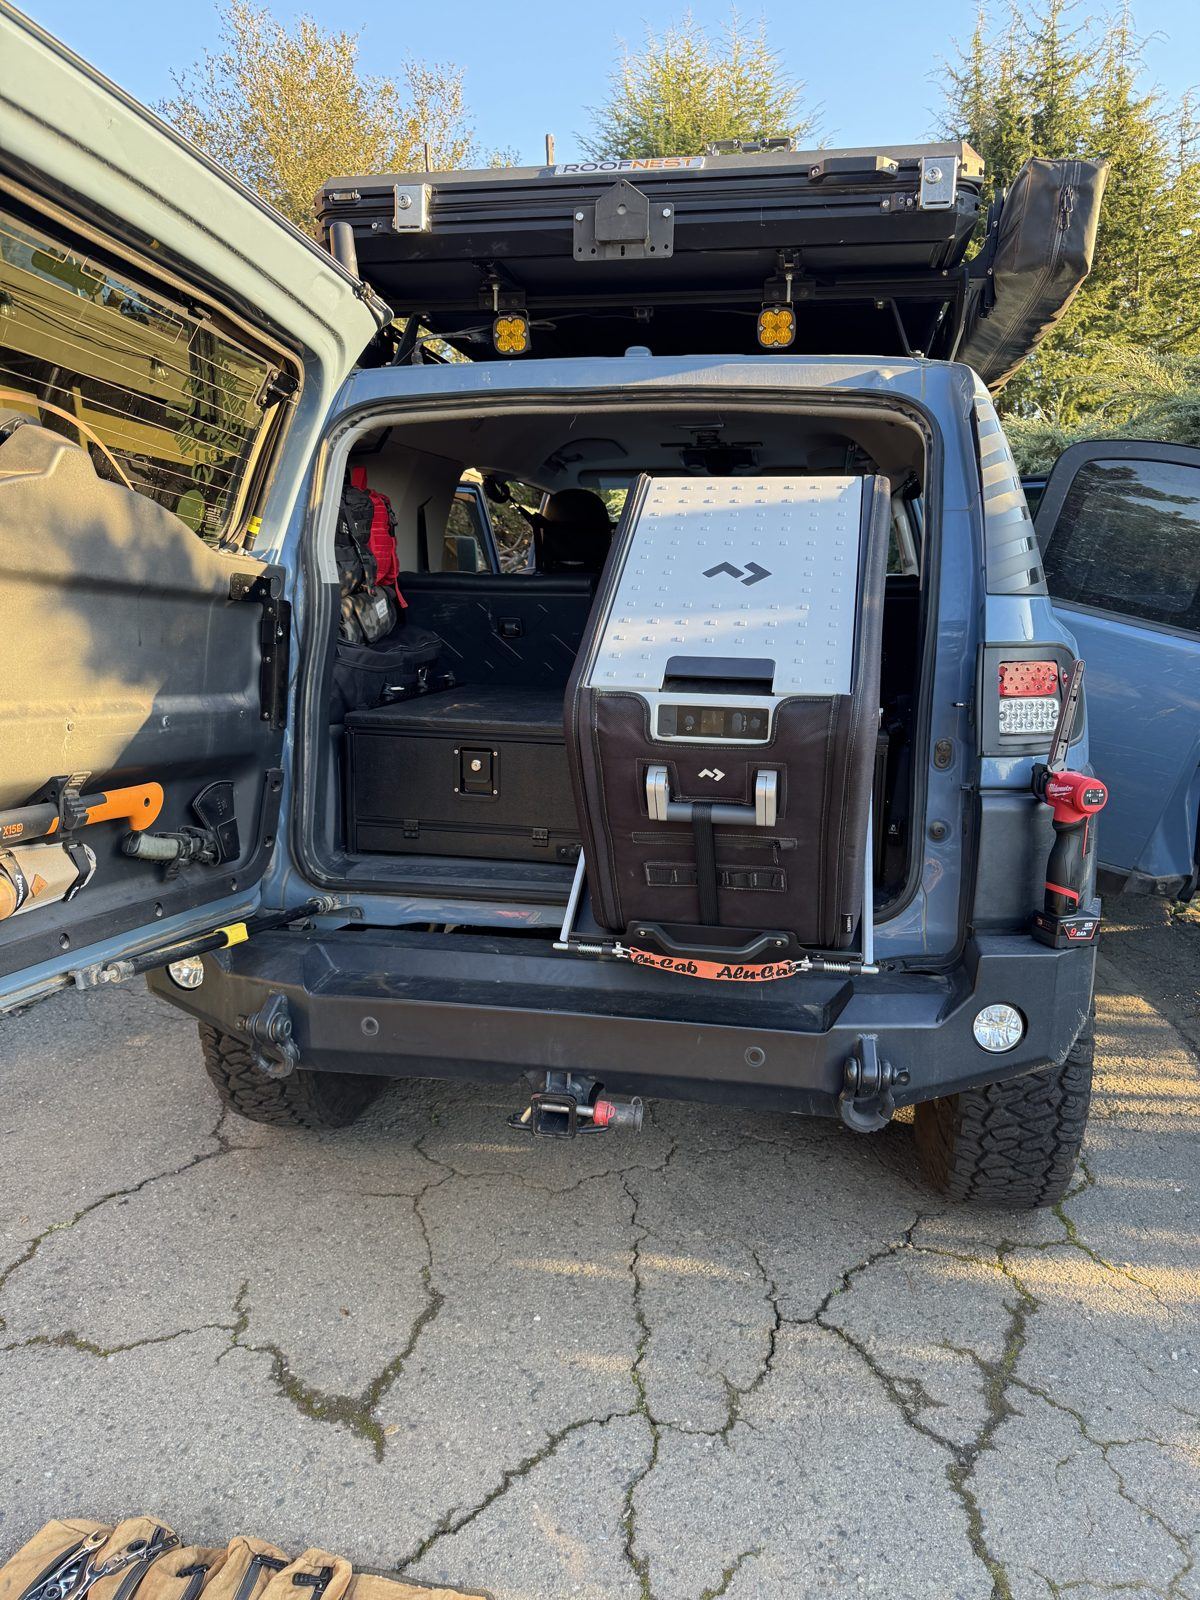
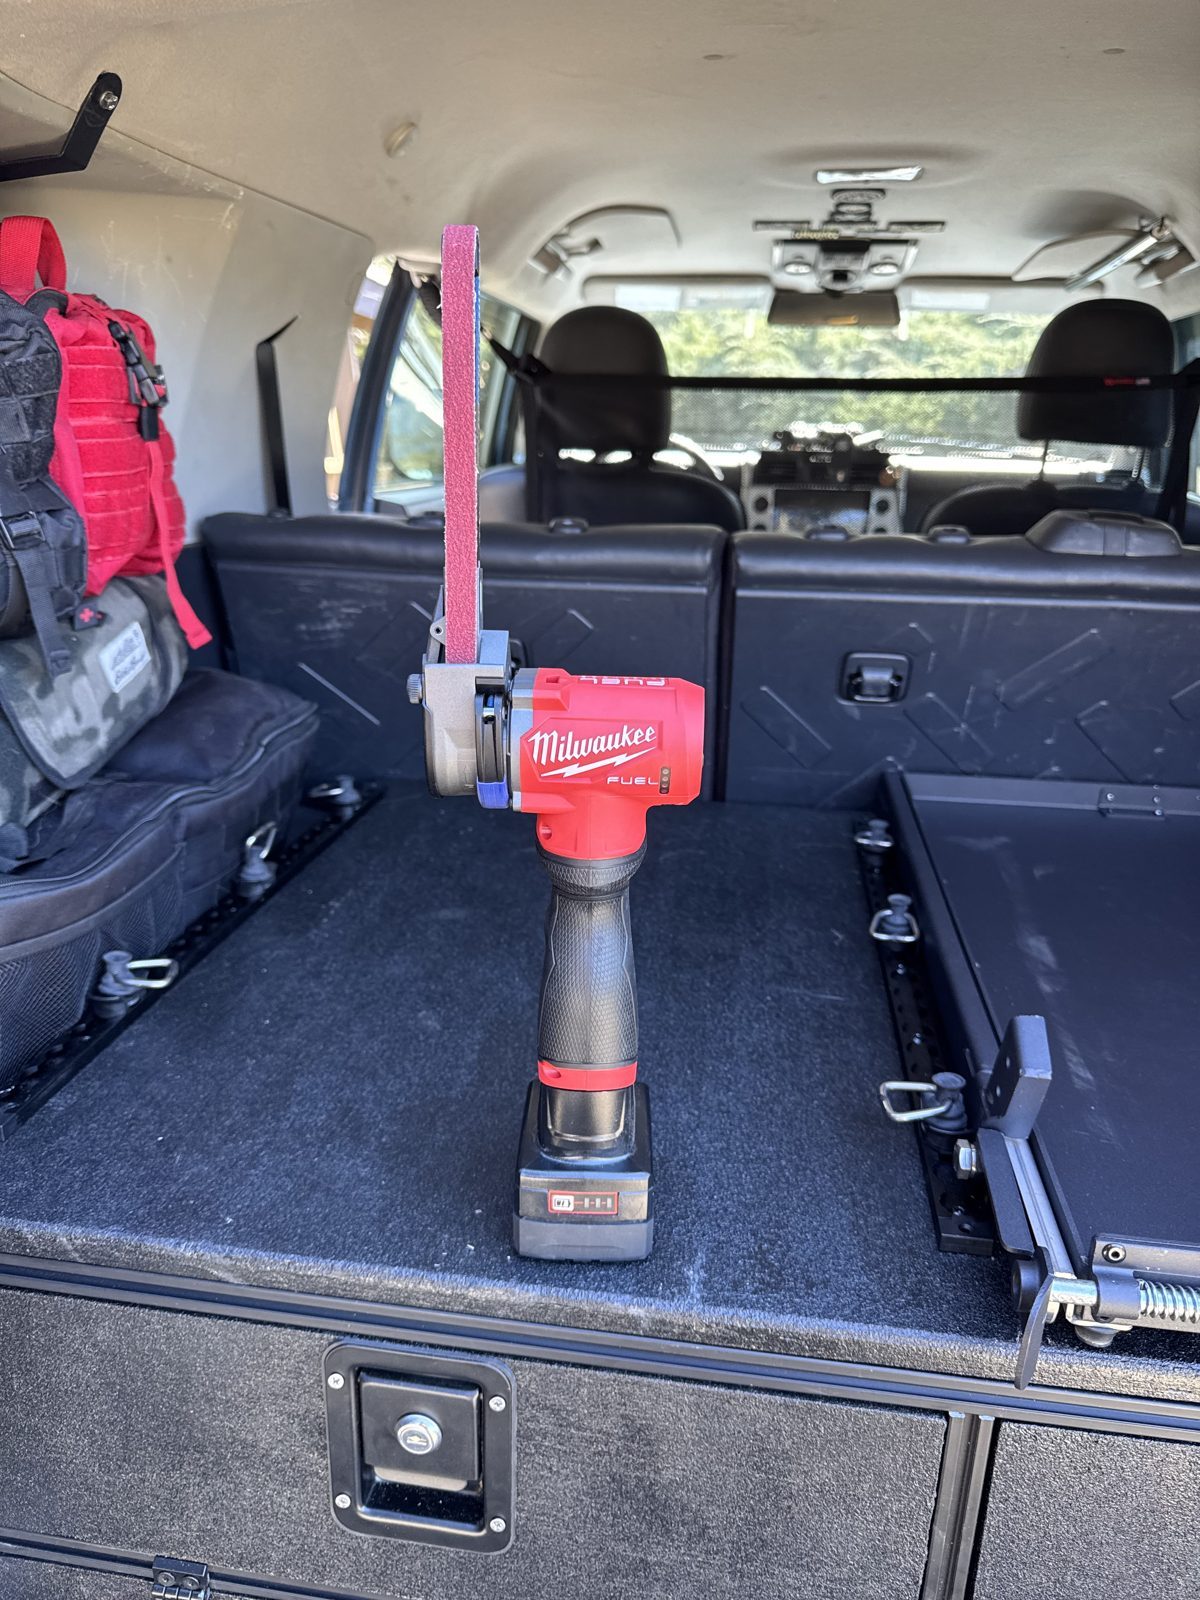
It brought its own problem. The Alu-Cab has two tabs projecting forward off the front, and with the box pushed back where it belongs those tabs hit the cargo door's interior plastics. They got ground down with a cutoff wheel until the door closed clean.
The DFG slide and the old plywood box both sold on, which recovered a good part of the slide's cost. The lesson still stands: the fridge, its slide extended and tilted, the seat backs and the door trim all belong in the side-view drawing before the box height is fixed.
Rebuild: the table slot
The June 2025 rebuild moved the camp table from a hinged flap under the drawers to a dedicated slot between the drawers and the top. That slot has run about a year and a half with no sag.
What the flap was
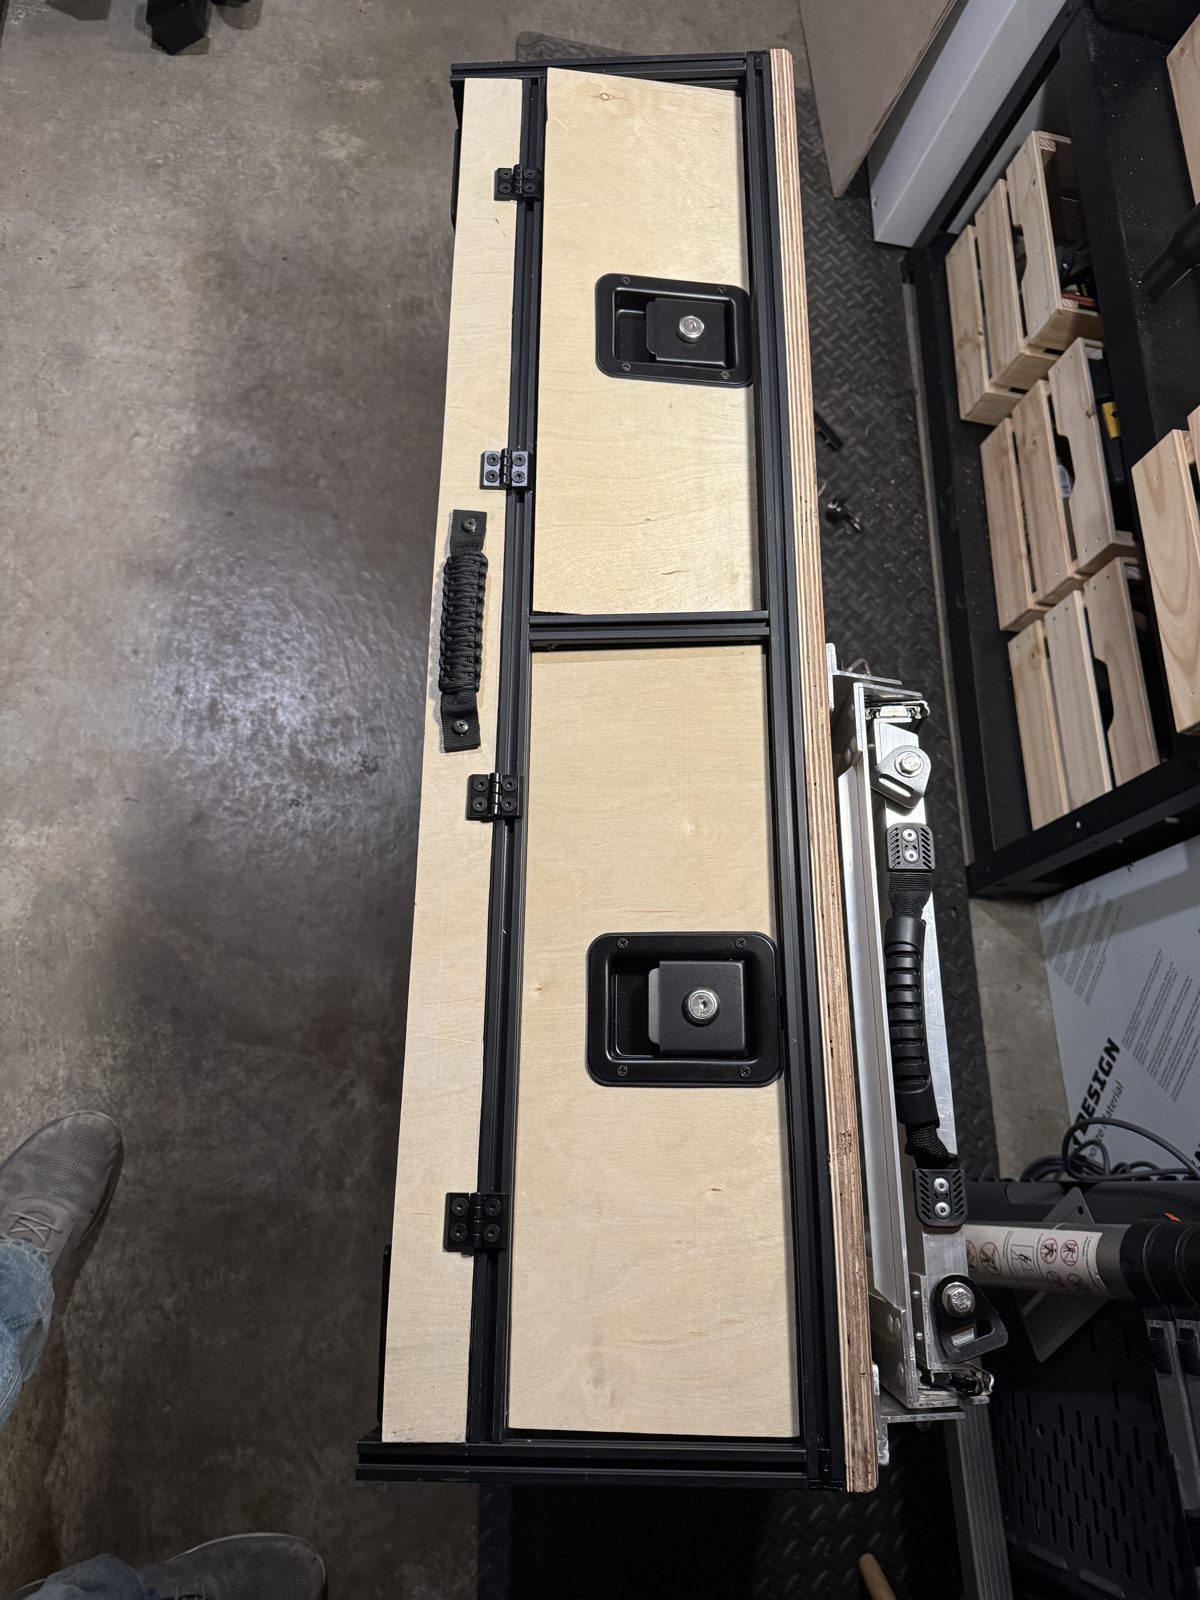
The first build stored the Dometic GO table, open flat with its legs folded, in a 2.25" gap under the drawers where the old box's feet had been. A plywood flap on four 2020 hinges closed the gap, with a paracord grab handle as its pull, and the table slid in over it. Empty, it worked.
Why it failed
Loaded for a trip, with bins strapped on top and a full fridge, the whole box bore down on that bottom gap. The flap sagged, the clearance closed, and the table wouldn't come out without a fight. A hinged panel at the bottom of a loaded box is the worst place to put something that has to slide.
What replaced it
The slot moved up. Four more 48" lengths of 2020 framed a new horizontal level directly under the top, sized to the table's open-flat, legs-folded footprint with a little clearance. Two panels of 1/2" plywood, painted black, drop into the frame as the slot floor; they keep the table off the drawers and stop anything falling through. The table slides on the extrusion rails, not on the plywood, so there's nothing to sag.
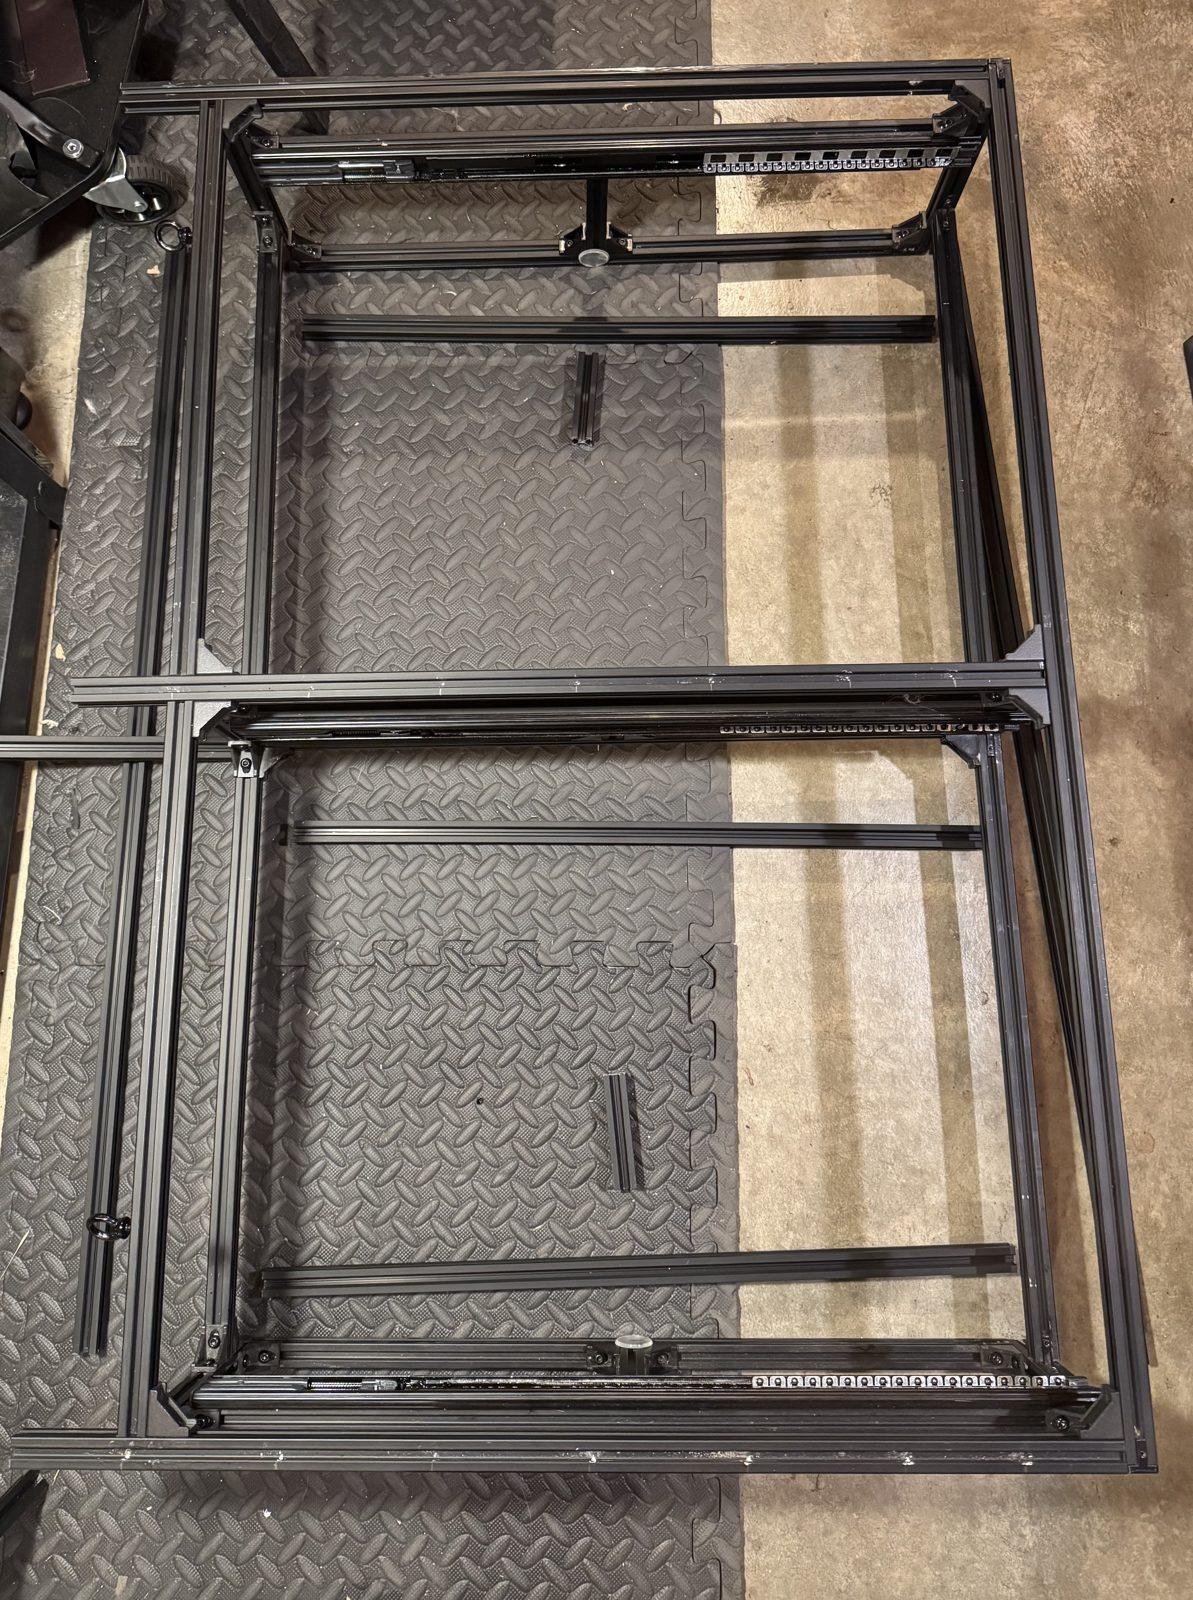
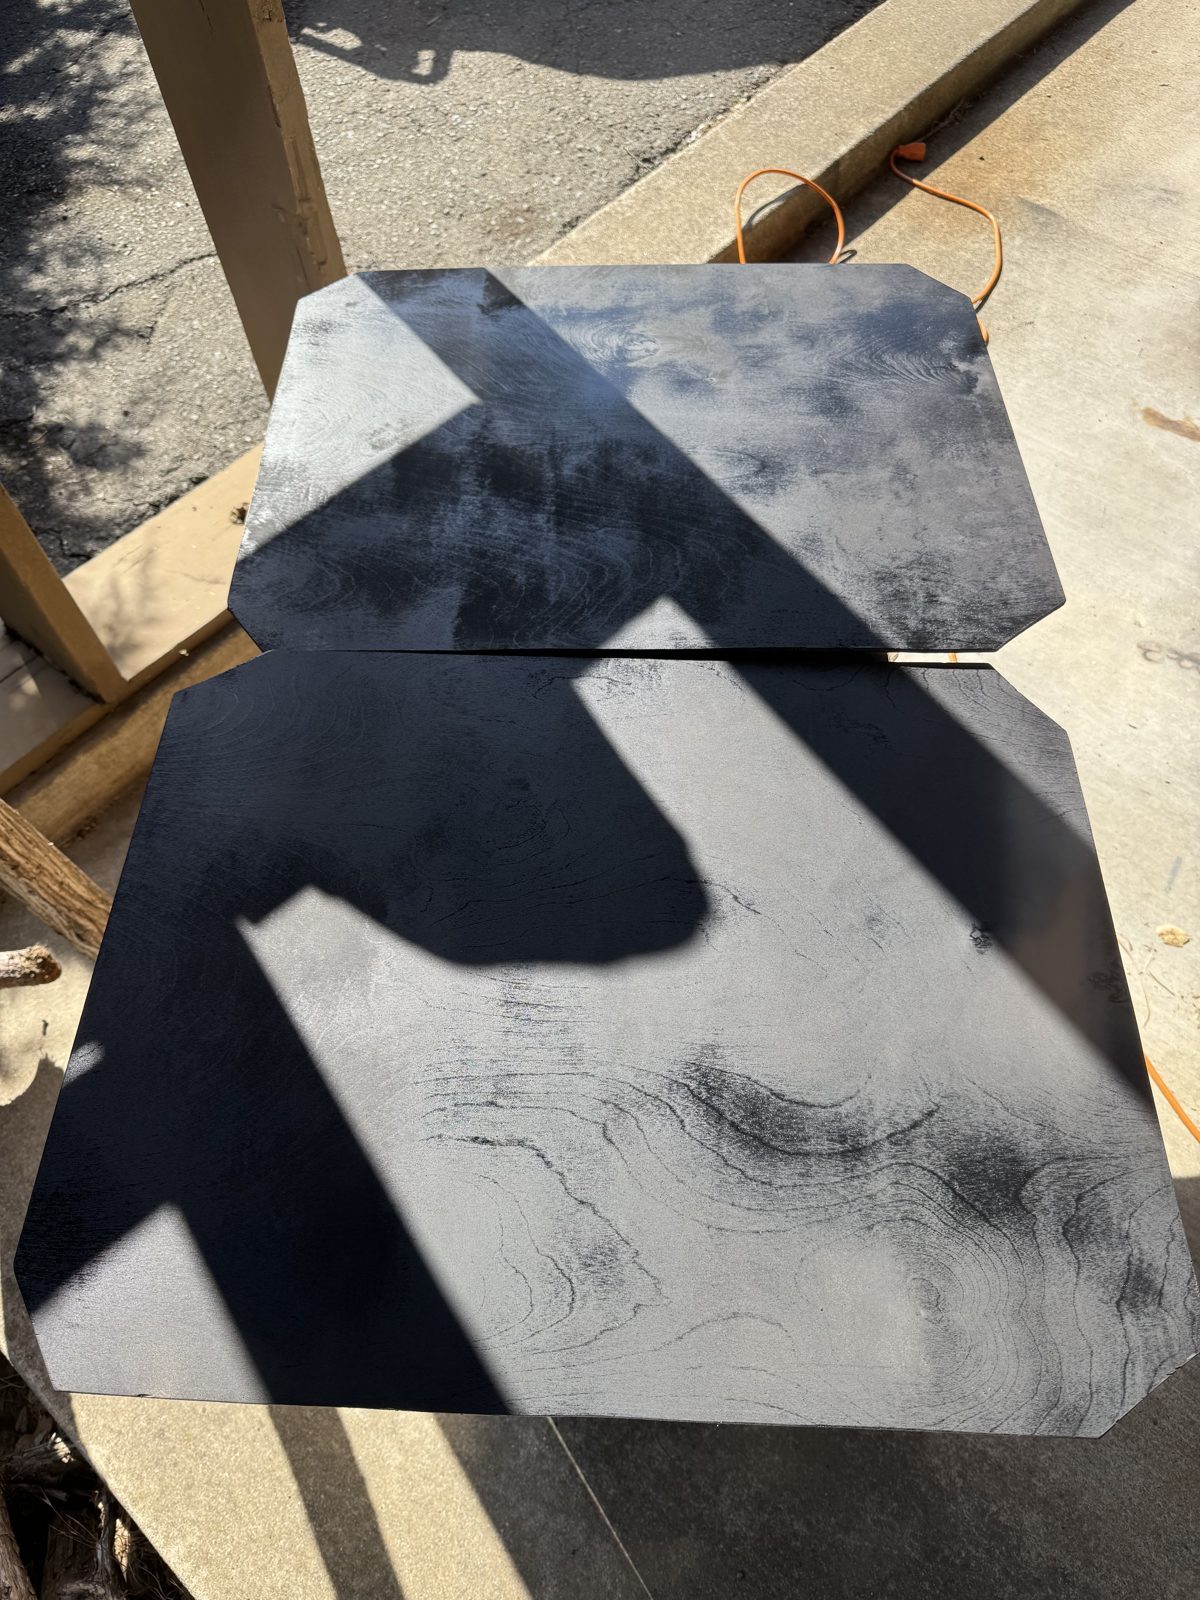
The slot height, the table's stored size and the clearance around it are in the plans. The drawers and the top didn't change; the frame gained one level, and the box got taller by that level plus the top rail.
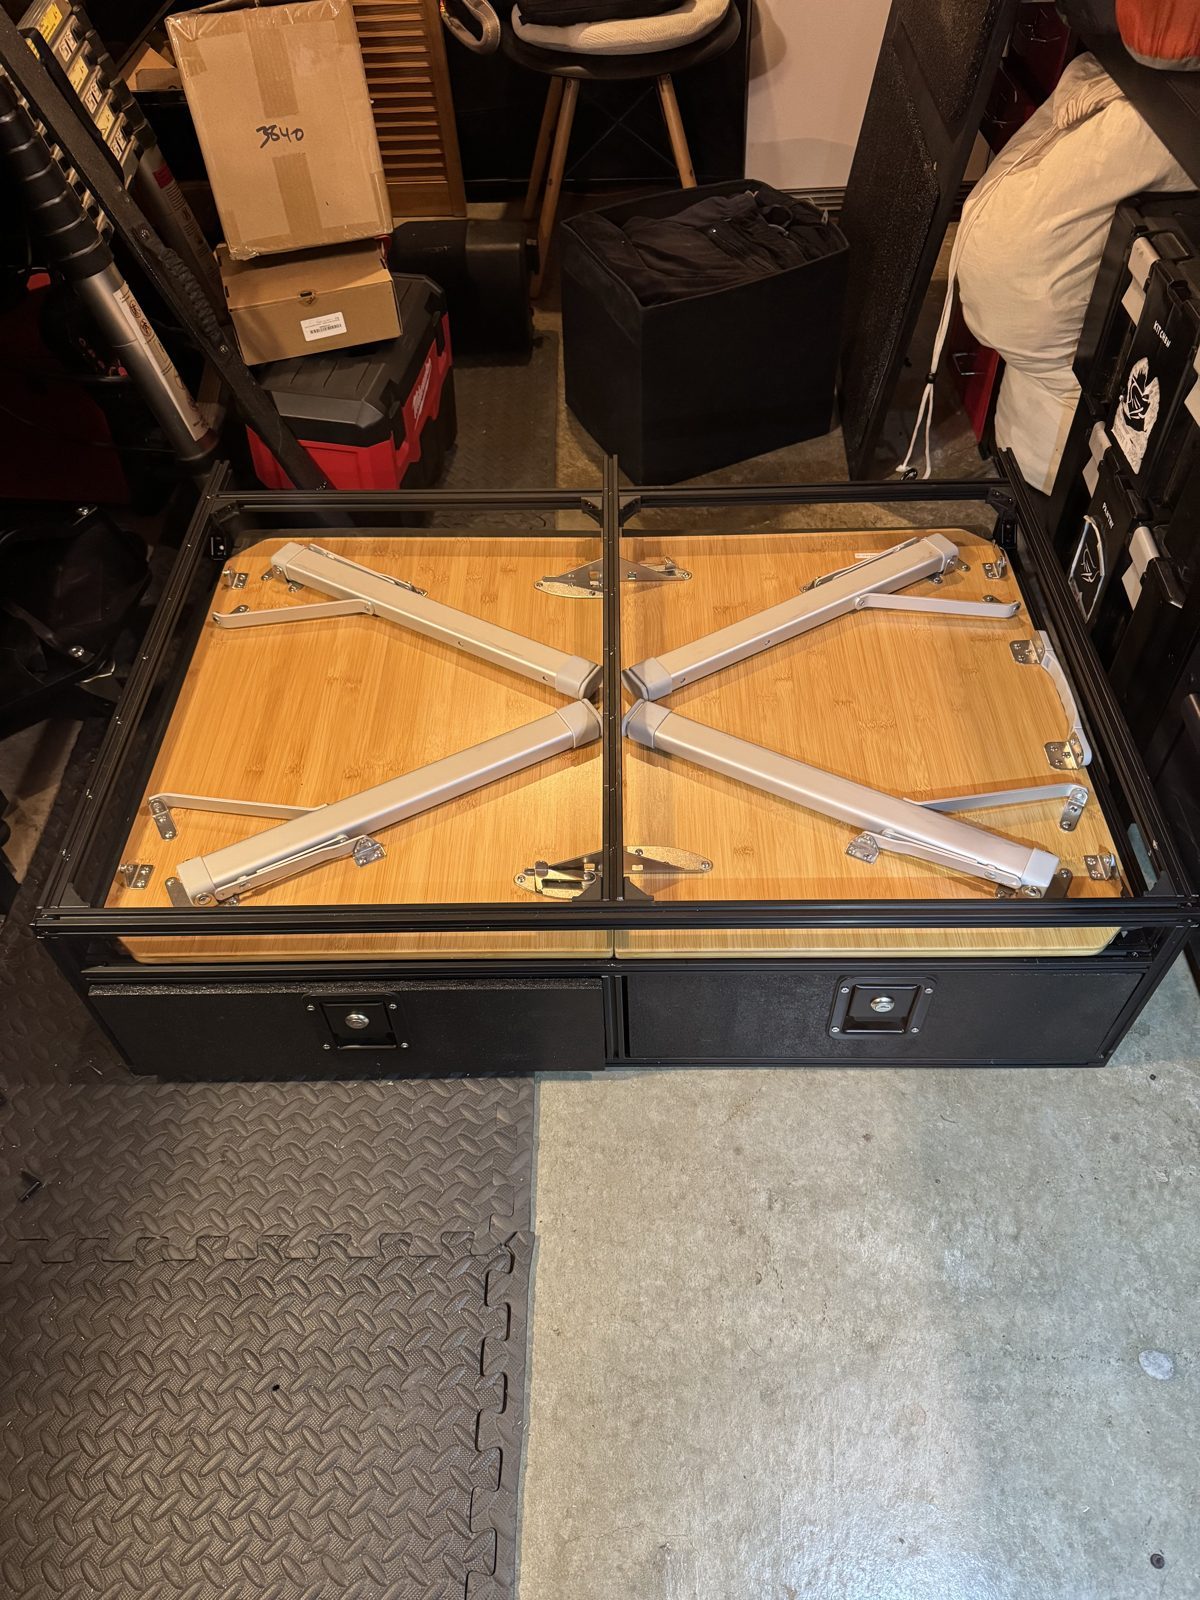
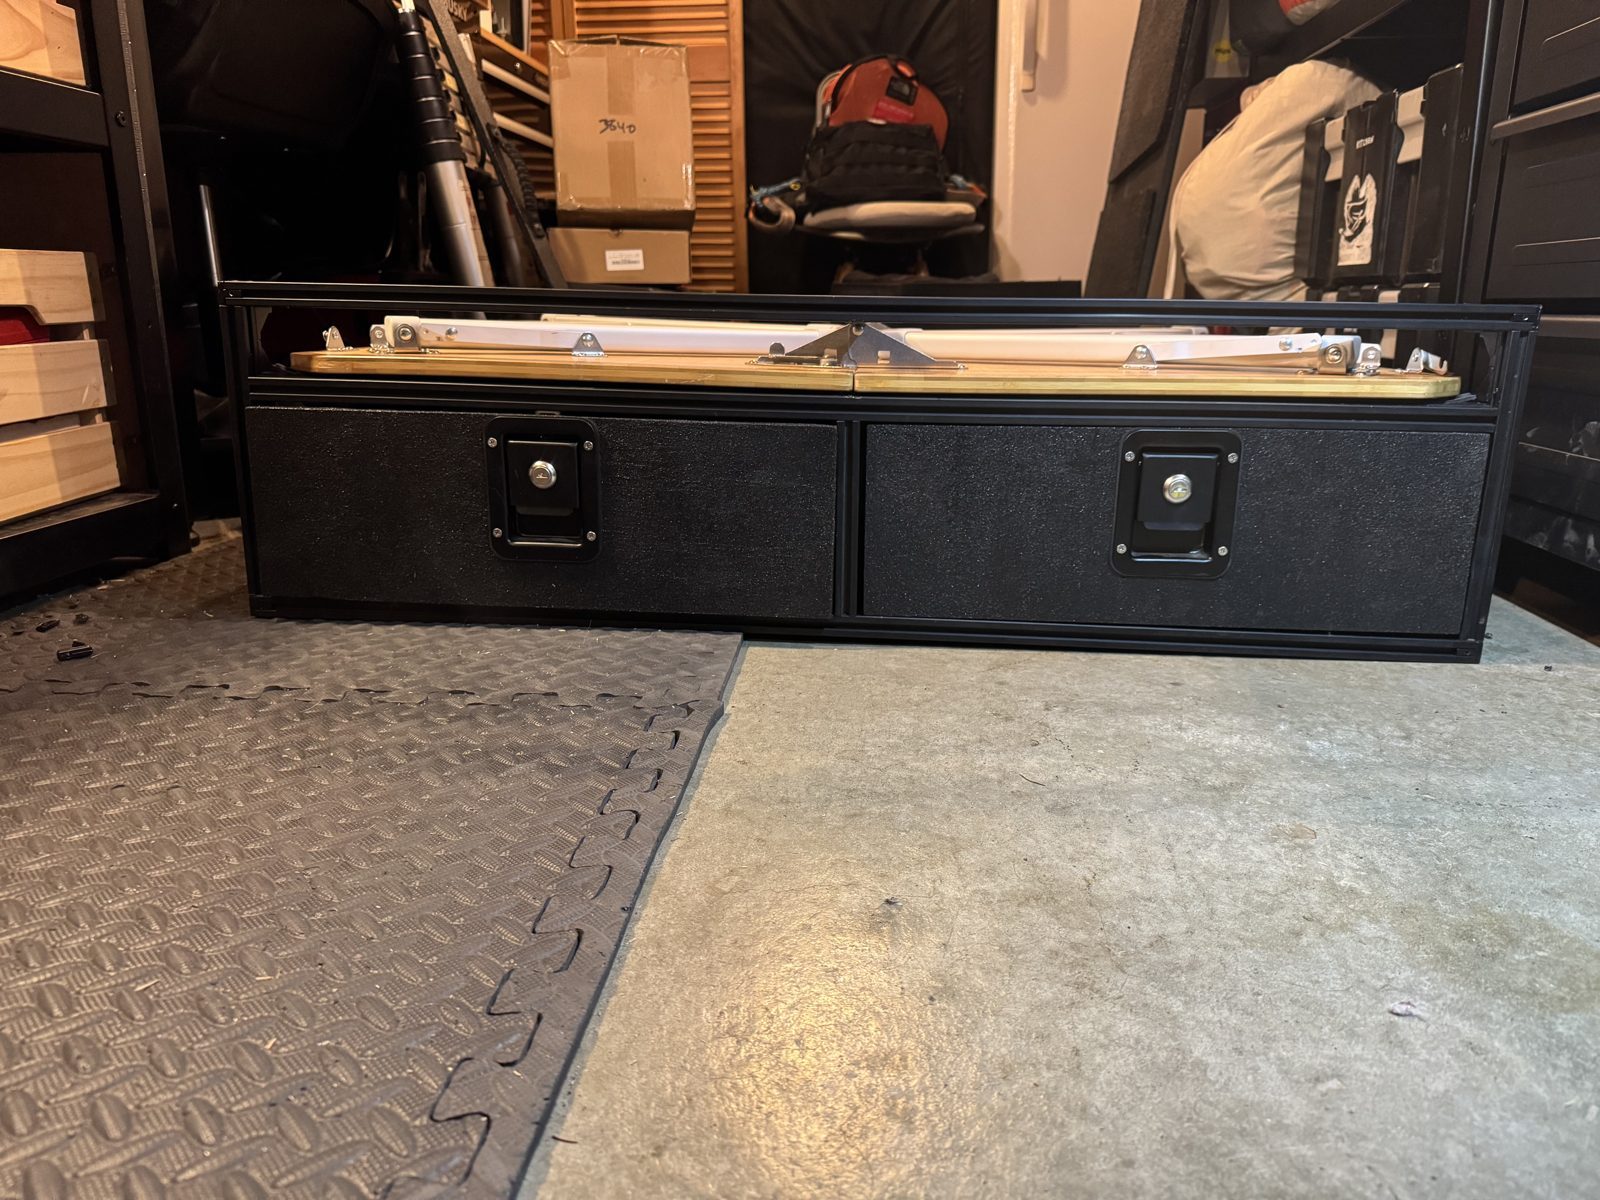
Why this is the case for extrusion
The rebuild cost four lengths of extrusion, a 30-pack of brackets, two small plywood panels and an afternoon. The drawers, fronts, slides, latches, L-track and finish all carried over untouched. In an all-wood box the same change is a new box.
Lessons, and what I'd do differently
- Draw the full stack before cutting. Floor to headliner, with the seat back angle, the door trim, and the fridge on its slide extended and tilted. Both of this build's rework items, the slide swap and the tab grinding, were envelope misses that a side-view sketch would have caught.
- Don't put a sliding thing at the bottom of a loaded box. Anything that has to slide out needs to ride on rails that carry no load, which is what the rebuild slot does.
- Measure the gear in its stored state, not its spec sheet. The Dometic table's open-flat, legs-folded size isn't published, and it's the only number the slot cares about.
- ACM needs a V-groove, not a brake. If you want folded aluminum-look drawers, rout the back and fold by hand, or go to real aluminum sheet.
- Plywood "for now" lasts. Two years in, the 1/2" birch drawers haven't been a problem. Build the cheap version first and see if you still want the expensive one.
- Buy one series of T-nut and label the bag. A stray pack of 3030 nuts in a 2020 build is money and confusion.
- Keep extrusion offcuts. The rebuild's short pieces came out of the first build's spare.
- Label every cut with where it goes. The sticky notes in the photos aren't a joke; they're why the frame went together once.
Cost and time
The pre-build budget was $466 for the box itself, excluding the fridge and its slide. Actual spend ran higher because of the ACM that snapped, the plywood that replaced it, the extra bracket kits, and the rebuild extrusion. The actual column is what the same listings cost on Amazon in October 2026, so it moves with their prices. Plywood is the big one, and it was never the plan. The $74 plywood line was for the top and the drawer fronts; the drawer boxes were going to be ABS sheet slid into the extrusion channels. When the ACM snapped a week before a trip, 1/2" birch project panels went in as the fallback, and two 24" x 48" plus two 24" x 24" of them ran $185 on their own. The 3/4" panel is another $103 at the nearest current listing. Build the drawers the way the plan intended, in plastic sheet, or buy a 4x8 sheet from a lumber yard instead of project panels, and the box lands much closer to the $466.
| Line | Planned | Actual |
|---|---|---|
| Extrusion, first build | $130 | $111 |
| Connectors, brackets, T-nuts, front L brackets, flat bar | $107 | $130 |
| Plywood | $74 | $288 |
| Drawer slides | $59 | $49 |
| Latches | $23 | $23 |
| L-track and caps | $55 | $50 |
| Hinges | $11 | $10 |
| Eye bolts and turnbuckles | $18 | $18 |
| Coating and roller kit | not budgeted | $80 |
| Spray paint and grab handle | not budgeted | $27 |
| ACM sheet, unused | not budgeted | $35 |
| Rebuild extrusion, brackets and caps | not budgeted | $83 |
| Total | $466 | about $900 |
Against that, the DFG slide ($420 new) and the old plywood box both sold on, which took some of the sting out of the slide swap.
What I actually bought
The post describes parts by spec so you can source them anywhere. These are the specific listings this build used, for anyone who wants to match it exactly.
- First build, November 2024: 10x 48" and 4x 700 mm 2020 T-slot (Amazon, generic); 8 sets 3-way corner connectors; 2 BLCCLOY kits of 20 corner brackets with M6 T-nuts; 20 TTZEZE interior L-joints; National Hardware 1" x 36" steel flat bar.
- First build, December 2024 to January 2025: Falken Design ACM sheet 1/8" x 24" x 36" (unused); QWORK stainless flush paddle latches, keyed alike; Falken Design birch project panel 3/4" A2, 36" x 48"; 2 pairs VADANIA VK1245 24" soft-close slides; 1 more BLCCLOY bracket kit; Qjaiune 25x M6 T-nuts; QIJINTRID 25x 3030 T-nuts (wrong series); 6 adjustable slotted L brackets 4.25" x 2"; 2x VanEssential 24" Venture Track L-track and end caps; Antrader M6 stainless eye bolts, 4-pack; PHITUODA M10 stainless hook-and-hook turnbuckles, 3-pack; KOOTANS 2020 hinges, 4 sets; Voodonala paracord grab handle; Falken Design birch 1/2" B3, 24" x 48" and 2x 24" x 24", plus another 24" x 48" in January; 2 quarts Rust-Oleum 342668 Automotive Truck Bed Coating; Custom Shop texture paint and bedliner roller kit; black spray paint.
- Fridge slide swap, early 2025: Alu-Cab Tilting Fridge Slide, Small/Medium.
- Rebuild, June 2025: 4x 48" 2020 extrusion (match your first order); PETOX 30-set corner brackets with M5 T-nuts; 4 VanEssential L-track end caps.
The dimensioned drawings, the cut list, the drawer and slot dimensions, the tie-down layout and the rebuild, as a PDF for the FJ. Coming soon in the Store.
If this saves you a box, tell the next guy where you got it. And tell him what we told you: this is what we did, not what you should do, and the risk is his.